


 Object Model
Syntax
| Visual Basic (Declaration) | |
|---|---|
Public Class TimeSlider Inherits System.Windows.Controls.Control | |
| C# | |
|---|---|
public class TimeSlider : System.Windows.Controls.Control | |
Remarks
The TimeSlider Control is a User Interface (UI) control that looks and acts very similar to the buttons that one would find on a DVD or MP3 player. The TimeSlider emits TimeExtent values that are typically used in conjunction with the Map Control to enhance the viewing of geographic features that have attributes based upon Date/Time information. In most circumstances, the TimeSlider.Value Property is bound to the Map.TimeExtent Property to control the visible geographic features in a Layer that have temporal data.
Note: When a geographic feature has a TimeExtent that falls within the Map.TimeExtent, that feature will be displayed. Conversely, when the TimeExtent of the geographic feature is no longer within the Map.TimeExtent it is no longer displayed in the Map.
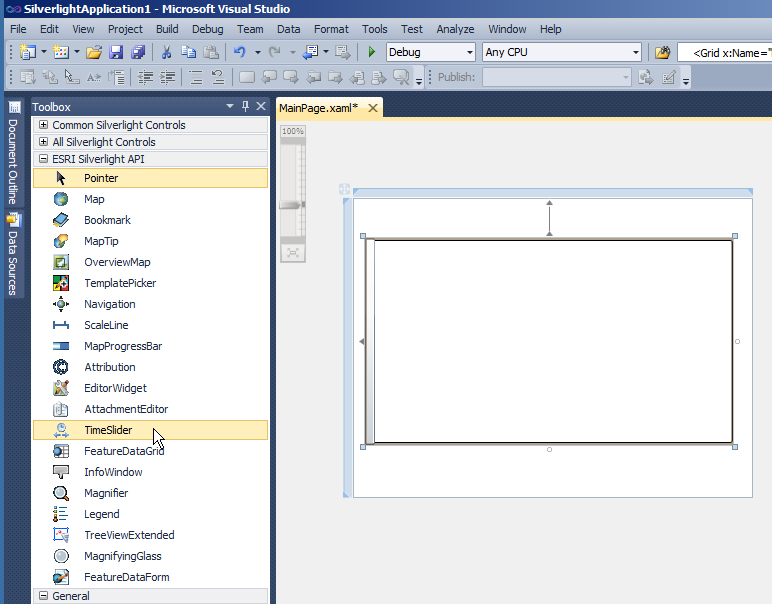
The TimeSlider Control can be created at design time in XAML or dynamically at runtime in the code-behind. The TimeSlider Control is one of several controls available in the Visual Studio Toolbox when the ArcGIS API for Silverlight is installed, see the following screen shot:
The default appearance of the TimeSlider Control can be modified using numerous inherited Properties from System.Windows.FrameworkElement, System.Windows.UIElement, and System.Windows.Controls. An example of some of these Properties include: .Height, .Width, .BackGround, .BorderBrush, .BorderThickness, .Foreground, .HorizontalAlignment, .VerticalAlignment, .Margin, .Opacity, .Visibility, etc.
Note: you cannot change the core behavior of the sub-components (i.e. ToggleButton, Rectangle, Grid, Thumb, Border, RepeatButton, Button, Path, etc.) of the TimeSlider Control using standard Properties or Methods alone. To change the core behavior of the sub-components and their appearance in the Control, developers can modify the Control Template in XAML and the associated code-behind file. The easiest way to modify the UI sub-components is using Microsoft Expression Blend. Then developers can delete/modify existing or add new sub-components in Visual Studio to create a truly customized experience. A general approach to customizing a Control Template is discussed in the ESRI blog entitled: Use control templates to customize the look and feel of ArcGIS controls. Specific code examples of modifying the Control Template of the TimeSlider Control to can be found in the IsPlaying and Loop Properties documents.
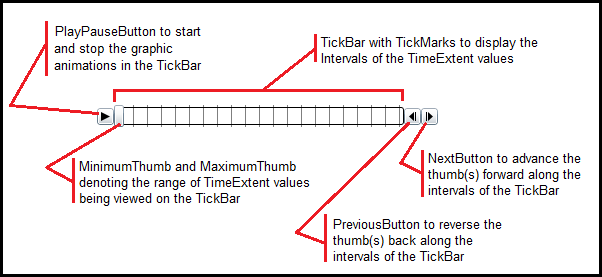
The TimeSlider Control is comprised of the following sub-components:
- A TickBar with TickMarks to display the Intervals of TimeExtent values
- A PlayPauseButton to start and stop the graphic animations playing in the TickBar
- A MinimumThumb and MaximumThumb to denote the range of TimeExtent values being viewed along the TickBar
- A NextButton to advance the thumb(s) forward along the intervals of TickBar
- A PreviousButton to reverse the thumb(s) back along the intervals of the TickBar
The following image shows a typical TimeSlider Control and its various sub-component parts:
Clients have the ability to use the various Play, Pause, Next, and Previous buttons on the TimeSlider to control the animation of which geographic features are displayed very similar to one watching a movie on a DVD player or listening to music on and MP3 player. Users can also drag/slide the thumb(s) on the TimeSlider to move to an exact position in the timeline of the TimeExtent for more control over feature viewing.
The bare minimum Properties that need to be set on the TimeSlider in order to have functioning interaction between the TimeSlider and Map Controls are MinimumValue, MaximumValue, and Value (as well as binding the Map.TimeExtent to the TimeSlider.Value). This will give a TimeSlider where the user can move the thumb(s) and have the Map Control respond accordingly. But having only this bare minimum will not provide the full functionality of the PlayPauseButton, NextButton, and PreviousButton being visible. In order to have the full functionality of the TimeSlider the Intervals Property must also be set.
The setting of the initial Value Property for end users typically corresponds to the left-most TickMark position on the TickBar of the TimeSlider. This enables end users to click the Play icon of the PlayPauseButton to begin an animation from the beginning of the series of temporal geographic observations. There are several ways that a developer could determine what the Date/Time of the left-most TickMark position is; the following is a list of some common ways to determine this left-most Date value:
- TimeSlider.MinimumValue Property
- TimeSlider.CreateTimeStopsByTimeInterval.First Property of the Static Function
- TimeSlider.CreateTimeStopsByCount.First Property of the Static Function
- FeatureLayer.TimeExtent.Start Property
- ArcGISDynamicMapServiceLayer.TimeExtent.Start Property
- ArcGISImageServiceLayer.TimeExtent.Start Property
- Set it manually in XAML or code-behind to a known Date/Time
- Obtain the initial start Date/Time of the TimeExtent from your own custom function (see the code example in the TimeSlider.TimeMode Property documentation for obtaining the initial TimeSlider.Value from a subset of Graphics in a FeatureLayer rather that the FeatureLayer’s published TimeExtent.Start)
NOTE: you use Date/Time value(s) to construct a TimeExtent object.)
The TimeExtent object that is used by the TimeSlider.Value Property can be essentially constructed two ways: (1) as an 'instance-in-time' or (2) as a 'period-of-time'. Depending on how the TimeExtent object is constructed will have implications for how the TimeSlider behaves when the TimeSlider.Value is set. It is important to remember that a Map Control that is bound to a TimeSlider will only display geographic features that match the TimeSlider.Value Property. The TimeSlider.TimeMode Property also plays crucial role in how the TimeSlider behaves and setting the correct TimeExtent for the TimeSlider.Value will impact the TimeSlider.TimeMode setting. When using the TimeMode Enumerations of CumulativeFromStart and TimeExtent, it is best that you construct the TimeSlider.Value using a 'period-of-time' for the TimeExtent object. When using the TimeMode Enumeration of TimeInstant, it is best that you construct the TimeSlider.Value using an 'instance-in-time' for the TimeExtent object. By default the TimeSlider uses the TimeMode.CumulativeFromStart as its setting. The code example in the TimeSlider.Value document demonstrates the subtle differences you may want to explore.
The following code examples demonstrate manually creating an 'instance-in-time' and 'period-of-time' for a TimeExtent object:
XAML:
            <esri:TimeSlider Name="TimeSlider1" Value="2000/08/04 12:30:00 UTC" /> <!-- instance-in-time -->
            <esri:TimeSlider Name="TimeSlider1" Value="2000/08/04 12:30:00 UTC, 2000/08/05 12:30:00 UTC" /> <!-- period-of-time -->
C#:
            TimeSlider1.Value = new ESRI.ArcGIS.Client.TimeExtent(new DateTime(2000, 8, 4, 12, 30, 0)); // instance-in-time
            TimeSlider1.Value = new ESRI.ArcGIS.Client.TimeExtent(new DateTime(2000, 8, 4, 12, 30, 0), new DateTime(2000, 8, 5, 12, 30, 0)); // period-of-time
VB.NET:
            TimeSlider1.Value = New ESRI.ArcGIS.Client.TimeExtent(New Date(2000, 8, 4, 12, 30, 0)) ' instance-in-time
            TimeSlider1.Value = New ESRI.ArcGIS.Client.TimeExtent(New Date(2000, 8, 4, 12, 30, 0), New Date(2000, 8, 5, 12, 30, 0)) ' period-of-time
A word of caution about using the code-behind TimeSlider.Loaded Event if you are trying to obtain the TimeExtent Property of a Layer which contains temporal observations to calculate the TimeSlider.Value and TimeSlider.Intervals; this will not work. The TimeSlider.Loaded event occurs before the various Layer .Initialized Events occur so the Layer's .TimeExtent values will always be Nothing/null. Using the TimeSlider.Loaded Event to determine the TimeSlider.Value and TimeSlider.Intervals Properties is best when the TimeExtent values are known at design-time and the TimeSlider.Value and TimeSlider.Intervals just need constructing in the code-behind.
It is possible to set the TimeSlider.Value Property in XAML using Binding to another object. Just make sure the object you are binding to returns a TimeExtent object. The following is a simplified XAML fragment where the TimeSlider.Value is set to the TimeExtent of a FeatureLayer named 'EarthquakesLayer':
<esri:TimeSlider Name="TimeSlider1" Value="{Binding ElementName=MyMap, Path=Layers[EarthquakesLayer].TimeExtent, Mode=OneWay}" />
The types of ArcGIS Server Layers that support Time Info (i.e. they have TimeExtent information) that are useful with the TimeSlider are:
- ArcGISDynamicMapServiceLayer
- ArcGISImageServiceLayer
- FeatureLayer
- GraphicsLayer (which are based upon Graphic elements)
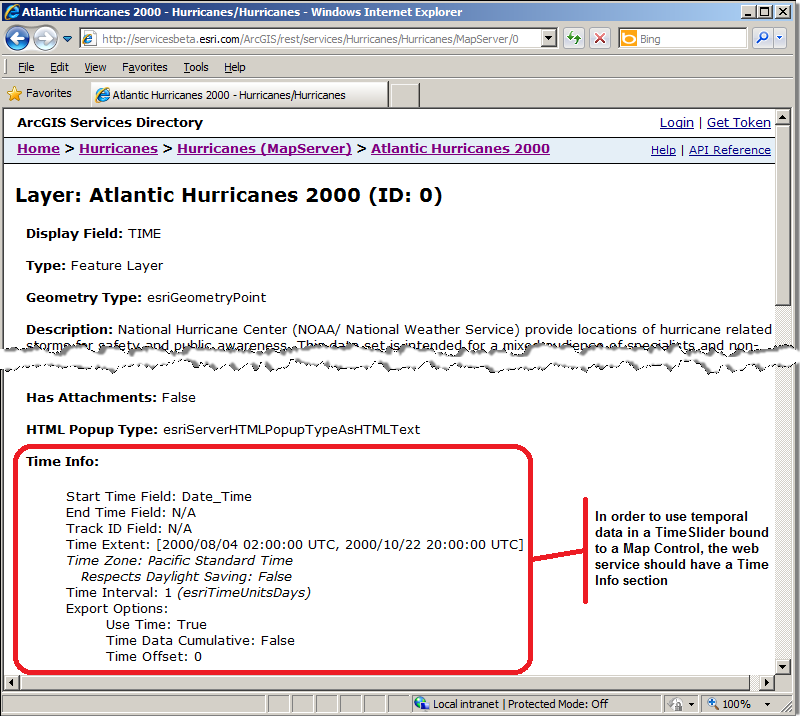
TIP: For the ArcGISDynamicMapServiceLayer, ArcGISImageServiceLayer, and FeatureLayer you can tell if TimeExtent information is available for the web service by copying the Url into the address bar of a web browser and scrolling through the ArcGIS Server web service description and look for a 'Time Info' section. See the following screen shot for a sample FeatureLayer:
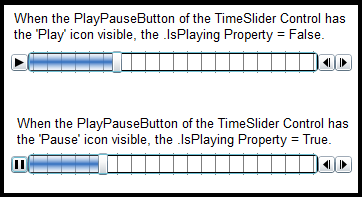
The IsPlaying Property gets or set as Boolean indicating whether the TimeSlider is playing through the Intervals of the TickBar. A value of True means the animating of the thumb(s) is occurring. A value of False means no animation is occurring. The default TimeSlider Control uses a ToggleButton for the PlayPauseButton to control the animations. When the Pause icon is visible that means animation is occurring (i.e. IsPlaying=True). When the Play icon is visible, that means the animation has stopped (i.e. IsPlaying=False). See the following screen shot for a visual depiction:
Under most circumstances it is not necessary to set the IsPlaying Property via code as this Property is automatically managed as part of the default TimeSlider Control. It is possible to modify the default behavior of the PlayPauseButton sub-component of the TimeSlider by editing it’s Control Template. The example code in the IsPlaying Property demonstrates a code example of using the set operation if customization is desired.
The TimeSlider.PlaySpeed Property uses a TimeSpan Structure to define how quickly the thumb moves across the tick marks on the TimeSlider. The default PlaySpeed is 1 second.
The PlaySpeed Attribute in XAML follows the format of "hh:mm:ss" where, hh = hours (0 to 24), mm = minutes (0 to 60), and ss = seconds (0 to 60). You can have fractions of a second by using decimal values. In the following XAML code fragment the PlaySpeed increments the time intervals every tenth of a second (i.e. 0.1).
<esri:TimeSlider Name="TimeSlider1" PlaySpeed="00:00:00.1"/>
In the code-behind there are several ways to make a TimeSpan using the constructor. The following code example(s) provides a few different examples that also produce the same time intervals every tenth of a second (i.e. 0.1):
VB.NET:
            TimeSlider1.PlaySpeed = New TimeSpan(100000) ' ticks
            TimeSlider1.PlaySpeed = New TimeSpan(0, 0, 0.1) ' hours, minutes, seconds
            TimeSlider1.PlaySpeed = New TimeSpan(0, 0, 0, 0.1) ' days, hours, minutes, seconds
            TimeSlider1.PlaySpeed = New TimeSpan(0, 0, 0, 0, 10) ' days, hours, minutes, seconds, milliseconds
C#:
            TimeSlider1.PlaySpeed = new TimeSpan(100000); // ticks
            TimeSlider1.PlaySpeed = new TimeSpan(0, 0, 0.1); // hours, minutes, seconds
            TimeSlider1.PlaySpeed = new TimeSpan(0, 0, 0, 0.1); // days, hours, minutes, seconds
            TimeSlider1.PlaySpeed = new TimeSpan(0, 0, 0, 0, 10); // days, hours, minutes, seconds, milliseconds
The TimeSlider.TimeMode Property determines how the TimeSlider Control will represent a TimeExtent as the thumb(s) moves across the tick marks.
The TimeExtent that is shown visually in the TimeSlider Control is corresponds to the TimeSlider.Value Property. The TimeMode Property is set to one of three Enumerations:
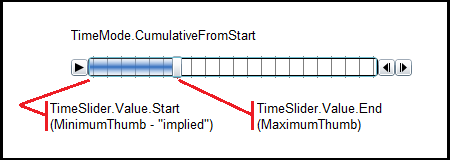
- TimeMode.CumulativeFromStart: This TimeMode setting will draw all observations on the Map from the oldest to the current as the MaximumThumb crosses a tic mark. It draws observations in a 'cumulative' effect. As the animation occurs, the TimeSlider.Value.Start will remain static but the TimeSlider.Value.End will constantly change. The MinimumThumb is not shown and is implied to be the same as the TimeSlider.Value.Start. The color in the Foreground of the TimeSlider will shade from the TimeSlider.Value.Start through the TimeSlider.Value.End as animation occurs. This is the default TimeMode setting on the TimeSlider. See the following screen shot:
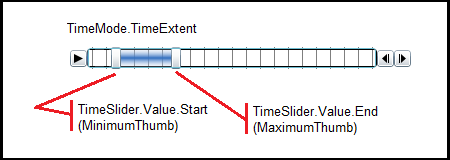
- TimeMode.TimeExtent: This TimeMode setting will draw only those observations on the Map that fall in a 'window of time' as defined by the TimeSlider.Value. As the thumbs (MinimumThumb and MaximumThumb) of the 'window of time' move across the tick marks the older observations will disappear and newer ones will appear. As the animation occurs, the TimeSlider.Value.Start (analogous to the MinimumThumb) will constantly change and the TimeSlider.Value.End (analogous to the MaximumThumb) will constantly change but the two difference between the Start and End times will be fixed. The Foreground shading of the TimeSlider will display in between the two thumbs as the animation occurs. See the following screen shot:
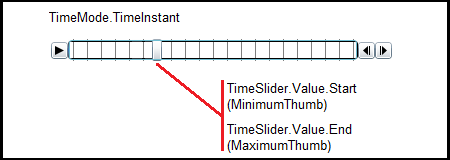
- TimeMode.TimeInstant: This TimeMode setting will draw only the most recent observations on the Map as the thumb(s) (MinimumThumb and MaximumThumb) crosses a tic mark. It draws observations in a 'snapshot' effect. As the animation occurs, the TimeSlider.Value.Start and the TimeSlider.Value.End will be exactly the same but values will change continuously. The MinimumThumb and MaximumThumb overlap each other exactly and give the visual appearance of only one thumb being show to demonstrate the snapshot effect. No Foreground shading occurs in the TimeSlider in the TimeMode.TimeInstant setting. See the following screen shot:
The TimeSlider.Loop Property gets or sets a value indicating whether the animating of the TimeSlider thumb(s) will restart playing when the end of the TickBar is reached. The Loop Property of True allows continuous playing of the thumb(s) across the TickBar of the TimeSlider. A False value means the thumb(s) will stop at the last Interval (i.e. the MaximumValue) in the TickBar when it is reached. The default Loop value of the TimeSlider is False.
The TimeSlider.MinimumValue Property specifies the starting Date/Time of the TimeSlider track.
The TimeSlider.MaximumValue Property specifies the ending Date/Time of the TimeSlider track.
Example
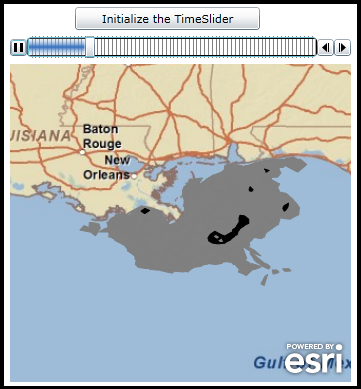
How to use:
Click the 'Initialize the TimeSlider' button to initialize the TimeSlider functions (PlayPause, Next, Previous) to display the observed oil spill and projected oil spill plume trajectory. Then click the play button to watch the animation. The black polygons represent actual oil spill observations by day. The gray polygons represent the area of the oil spill plume trajectory. As time moves forward in the example, the gray polygons will merge into one large polygon that is the cumulative trajectory over the course of the oil spill.
The XAML code in this example is used in conjunction with the code-behind (C# or VB.NET) to demonstrate the functionality.
The following screen shot corresponds to the code example in this page.
| XAML |  Copy Code Copy Code |
|---|---|
<Grid x:Name="LayoutRoot"> <!-- Add a Map control with an ArcGISTiledMapServiceLayer and a FeatureLayer. The Map.TimeExtent is bound to the MyTimeSlider (TimeSlider) control. The MyTimeSlider will control what TimeExtent (i.e. slices of time) can be viewed in the Map control. The FeatureLayer will contain several observations based upon Polygon geometries which have various TimeExtent values set. When the specific features have a TimeExtent that falls within the Map.TimeExtent will they be displayed based upon the MyTimeSlider settings. --> <esri:Map Background="White" HorizontalAlignment="Left" Margin="12,150,0,0" Name="Map1" VerticalAlignment="Top" Height="318" Width="341" Extent="-92.65,25.64,-85.53,32.28" TimeExtent="{Binding ElementName=MyTimeSlider, Path=Value}"> <esri:ArcGISTiledMapServiceLayer ID="PhysicalTiledLayer" Url="http://services.arcgisonline.com/ArcGIS/rest/services/ESRI_StreetMap_World_2D/MapServer" /> <!-- The FeatureLayer displays oil slick information in the Gulf of Mexico by day from the NOAA. --> <esri:FeatureLayer ID="MyFeatureLayer" Url="http://servicesbeta.esri.com/ArcGIS/rest/services/GulfOilSpill/Gulf_Oil_Spill/MapServer/0" OutFields="*"> <esri:FeatureLayer.Renderer> <esri:TemporalRenderer> <!-- The Gray polygons display the projected trajectory of the oil slick. The Black polygons display actual observed oil on the water. --> <esri:TemporalRenderer.ObservationRenderer> <esri:SimpleRenderer> <esri:FillSymbol Fill="Gray" BorderBrush="Gray"/> </esri:SimpleRenderer> </esri:TemporalRenderer.ObservationRenderer> <esri:TemporalRenderer.LatestObservationRenderer> <esri:SimpleRenderer> <esri:FillSymbol Fill="Black" BorderBrush="Black"/> </esri:SimpleRenderer> </esri:TemporalRenderer.LatestObservationRenderer> </esri:TemporalRenderer> </esri:FeatureLayer.Renderer> </esri:FeatureLayer> </esri:Map> <!-- Add a TimeSlider to control the display of what geographic features are displayed in the Map Control based upon a specified TimeExtent. In the case of this sample code, when the specific features have a TimeExtent that falls within the Map.TimeExtent will they be displayed based upon the MyTimeSlider settings. Tip: It is the x:Name Attribute that allows you to access the TimeSlider Control in the code-behind file. The PlaySpeed Attribute follows the format of "hh:mm:ss" where, hh = hours (0 to 24), mm = minutes (0 to 60), and ss = seconds (0 to 60). In this example the PlaySpeed increments the time intervals every half a second (i.e. 0.5). The TimeMode Attribute of CumulativeFromStart means there is a fixed start date/time (2010/05/24 20:00:00 UTC in this example) that does not change and an end date/time that adjusts as the specified Interval (one day in this example which is set in the code-behind) increases. As the 'thumb' of the TimeSlider control moves to the right along the slider track the TimeExtent Interval of the TimeSlider increases. The MinimumValue Attribute specifies the starting date/time of the TimeSlider track. The MaximumValue Attribute specifies the ending date/time of the TimeSlider track. The Value Attribute specifies the date/time location of the thumb along the TimeSlider track. The thumb can have a start date/time and end date/time set for a TimeExtent which will display a window of time as the thumb moves along the TimeSlider track but this is best for TimeMode Attribute of 'TimeExtent'. Since this example is showing a TimeMode of 'CumulativeFromStart' it is best to have the thumb just use a single date/time specified for the Value set to the same date/time as the MinimumValue. The last thing needed to enable the full capabilities of a TimeSlider (i.e. having the PlayPause, Next, and Previous buttons) is to set the Intervals Property. In Silverlight, this can only be done in code-behind to construct the Collection Type of IEnumerable(Of Date). Without the TimeSlider.Intervals being set the user has to manually move the thumb across the TimeSlider track to change the Map.TimeExtent and thereby see what Graphics can be displayed for that date/time window. --> <esri:TimeSlider x:Name="MyTimeSlider" MinimumValue="2010/05/24 20:00:00 UTC" MaximumValue="2010/08/05 20:00:00 UTC" Height="22" Margin="12,122,0,0" Value="2010/05/24 20:00:00 UTC" TimeMode="CumulativeFromStart" PlaySpeed="0:0:0.5" HorizontalAlignment="Left" VerticalAlignment="Top" Width="341"/> <!-- Provide the instructions on how to use the sample code. --> <TextBlock Height="75" HorizontalAlignment="Left" Name="TextBlock1" VerticalAlignment="Top" Width="455" TextWrapping="Wrap" Margin="12,12,0,0" Text="Click the 'Initialize the TImeSlider' button to initialize the TimeSlider functions (PlayPause, Next, Previous) to display the observed oil spill and projected oil spill plume trajectory. Then click the play button to watch the animation. The black polygons represent actual oil spill observations by day. The gray polygons represent the area of the oil spill plume trajectory. As time moves forward in the example the gray polygons will merge into one large polygon that is the cumulative trajectory over the course of the oil spill." /> <!-- Add a button to perform the work. --> <Button Content="Initialize the TimeSlider" Height="23" HorizontalAlignment="Left" Margin="77,93,0,0" Name="Button1" VerticalAlignment="Top" Width="185" Click="Button1_Click"/> </Grid> | |
| C# | Copy Code |
|---|---|
private void Button1_Click(object sender, System.Windows.RoutedEventArgs e) { // This function sets up TimeSlider Intervals that define the tick marks along the TimeSlider track. Intervals // are a Collection of IEnumerable<DateTime> objects. When the TimeSlider.Intervals Property is set along with // the other necessary TimeSlider Properties, the full functionality of the TimeSlider is enabled. This full // functionality includes buttons for Play, Pause, Forward, and Back. // Obtain the start and end DateTime values from the TimeSlider named MyTimeSlider that was defined in XAML. DateTime myMinimumDate = MyTimeSlider.MinimumValue; DateTime myMaximumDate = MyTimeSlider.MaximumValue; // Create a TimeExtent based upon the start and end date/times. ESRI.ArcGIS.Client.TimeExtent myTimeExtent = new ESRI.ArcGIS.Client.TimeExtent(myMinimumDate, myMaximumDate); // Create a new TimeSpan (1 day in our case). TimeSpan myTimeSpan = new TimeSpan(1, 0, 0, 0); // Create an empty Collection of IEnumerable<DateTime> objects. System.Collections.Generic.IEnumerable<DateTime> myIEnumerableDates = null; // Load all of Dates into the Collection of IEnumerable<DateTime> objects using the // TimeSlider.CreateTimeStopsByTimeInterval is a Shared/Static function. myIEnumerableDates = ESRI.ArcGIS.Client.Toolkit.TimeSlider.CreateTimeStopsByTimeInterval(myTimeExtent, myTimeSpan); // Set the TimeSlider.Intervals which define the tick marks along the TimSlider track to the IEnumerable<DateTime> // objects. MyTimeSlider.Intervals = myIEnumerableDates; } | |
| VB.NET | Copy Code |
|---|---|
Private Sub Button1_Click(ByVal sender As System.Object, ByVal e As System.Windows.RoutedEventArgs) ' This function sets up TimeSlider Intervals that define the tick marks along the TimeSlider track. Intervals ' are a Collection of IEnumerable(Of Date) objects. When the TimeSlider.Intervals Property is set along with ' the other necessary TimeSlider Properties, the full functionality of the TimeSlider is enabled. This full ' functionality includes buttons for Play, Pause, Forward, and Back. ' Obtain the start and end Date/Time values from the TimeSlider named MyTimeSlider that was defined in XAML. Dim myMinimumDate As Date = MyTimeSlider.MinimumValue Dim myMaximumDate As Date = MyTimeSlider.MaximumValue ' Create a TimeExtent based upon the start and end date/times. Dim myTimeExtent As New ESRI.ArcGIS.Client.TimeExtent(myMinimumDate, myMaximumDate) ' Create a new TimeSpan (1 day in our case). Dim myTimeSpan As New TimeSpan(1, 0, 0, 0) ' Create an empty Collection of IEnumerable(Of Date) objects. Dim myIEnumerableDates As System.Collections.Generic.IEnumerable(Of Date) ' Load all of Dates into the Collection of IEnumerable(Of Date) objects using the ' TimeSlider.CreateTimeStopsByTimeInterval is a Shared/Static function. myIEnumerableDates = ESRI.ArcGIS.Client.Toolkit.TimeSlider.CreateTimeStopsByTimeInterval(myTimeExtent, myTimeSpan) ' Set the TimeSlider.Intervals which define the tick marks along the TimSlider track to the IEnumerable(Of Date) ' objects. MyTimeSlider.Intervals = myIEnumerableDates End Sub | |
Inheritance Hierarchy
System.Object
System.Windows.DependencyObject
System.Windows.UIElement
System.Windows.FrameworkElement
System.Windows.Controls.Control
ESRI.ArcGIS.Client.Toolkit.TimeSlider
Requirements
Target Platforms: Windows XP Professional, Windows Server 2003 family, Windows Vista, Windows Server 2008 family, Windows 7