


 Syntax
| Visual Basic (Declaration) | |
|---|---|
Public Property MapTip As FrameworkElement | |
| C# | |
|---|---|
public FrameworkElement MapTip {get; set;} | |
Remarks
A GraphicsLayer.MapTip is a FrameworkElement that displays a visual popup containing information associated with a Graphic in the GraphicsLayer. Defining the User Interface (UI) look of the FrameworkElement for a GraphicsLayer.MapTip can be done in either XAML or code-behind.
Use the GraphicsLayer.MapTip Property when you want to have all of the MapTips in the GraphicsLayer have the same FrameworkElement look and feel. Alternatively, use the Graphic.MapTip Property when you want to have control over individual FrameworkElement MapTips look and feel in the GraphicsLayer.
There are several sources of where the information that is displayed in a GraphicsLayer.MapTip can come from:
- The information is stored in the Graphic.Attributes
- The information is hard coded
- The information is generated on the fly based upon user interaction with the Map
You can use a binding expression in XAML to bind Graphic.Attributes in the GraphicsLayer to the DataContext Property. The general usage syntax follows the pattern:
            <esri:GraphicsLayer>
              <esri:GraphicsLayeer.MapTip>
                <StackPanel Orientation="Horizontal" Background="White">
                  <TextBlock Text="Feature ID:" />
                  <TextBlock Text="{Binding [SomeAttributeName]}" />
                </StackPanel>
              </esri:GraphicsLayer.MapTip>
            <esri:GraphicsLayer>
Tip: Starting with Silverlight version 4, developers can perform DataContext binding directly to Dictionary Keys by specifying the Key name in brackets. Therefore when binding the DataContext of a GraphicsLayer.MapTip to a specific attribute name in the Graphic.Attributes (which is a Dictionary), encase the attribute name in square brackets (i.e. []). Example: <TextBlock Text="{Binding [Age]}" /> or the slightly more verbose version <TextBlock Text="{Binding Path=[Age]}" />).
Example
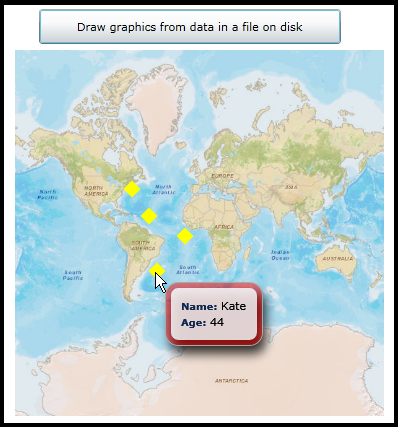
How to use:
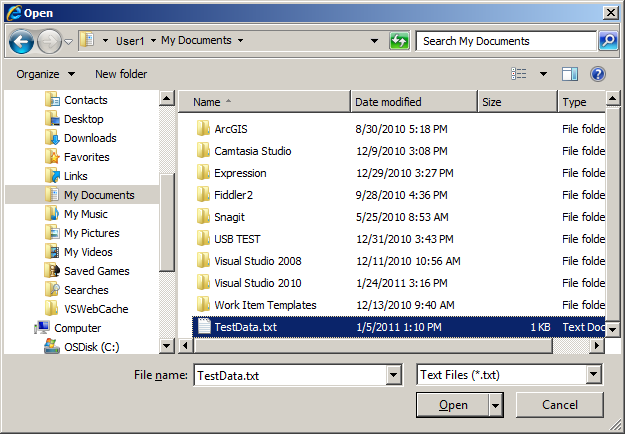
Click the button to load data in a textfile (.txt) on the local hard drive. The User Interface (UI) look and feel of the GraphicsLayer.MapTips are established in the XAML. Hover over a Graphic to see the MapTip.
The XAML code in this example is used in conjunction with the code-behind (C# or VB.NET) to demonstrate the functionality.
The following screen shots corresponds to the code example in this page.
| XAML |  Copy Code Copy Code |
|---|---|
<Grid x:Name="LayoutRoot"> <!-- Add a Map control with an ArcGISTiledMapServiceLayer. --> <esri:Map Background="White" HorizontalAlignment="Left" Margin="12,102,0,0" Name="Map1" VerticalAlignment="Top" Height="366" Width="616" > <esri:ArcGISTiledMapServiceLayer ID="PhysicalTiledLayer" Url="http://services.arcgisonline.com/ArcGIS/rest/services/World_Street_Map/MapServer" /> <!-- Define a GraphicsLayer which will be used to set up MapTips. --> <esri:GraphicsLayer ID="MyGraphicsLayer"> <esri:GraphicsLayer.MapTip> <!-- Define the User Interface (UI) look and feel of the FrameworkElement for the GraphicsLayer.MapTip --> <Border BorderBrush="DarkGray" CornerRadius="13" BorderThickness="1" Margin="0,0,15,15"> <Border.Effect> <DropShadowEffect ShadowDepth="10" BlurRadius="14" Direction="300" /> </Border.Effect> <Border CornerRadius="10" Background="#DDFFEEEE" BorderThickness="5" BorderBrush="#77FF0000"> <StackPanel Orientation="Vertical" HorizontalAlignment="Center" Margin="10"> <StackPanel Orientation="Horizontal"> <!-- Bind the DataContext of the various Graphic.Attribute values to the various TextBlocks. Information on DataContext documentation can be found at: http://msdn.microsoft.com/en-us/library/system.windows.frameworkelement.datacontext(v=vs.95).aspx Starting with Silverlight version 4, developers can perform DataContext binding directly to Dictionary Keys by specifying the Key name in brackets. Therefore, when binding the DataContext of a GraphicsLayer.MapTip to a specific attribute name in the Graphic.Attributes (which is a Dictionary), encase the attribute name in square brackets (i.e. []). Example: <TextBlock Text="{Binding [Age]}" /> or the slightly more verbose version <TextBlock Text="{Binding Path=[Age]}" />). --> <TextBlock Text="Name: " FontWeight="Bold" Foreground="#FF0F274E" FontSize="10" VerticalAlignment="Center"/> <TextBlock Text="{Binding Path=[Name]}" HorizontalAlignment="Left" VerticalAlignment="Center" /> </StackPanel> <StackPanel Orientation="Horizontal"> <TextBlock Text="Age: " FontWeight="Bold" Foreground="#FF0F274E" FontSize="10" VerticalAlignment="Center" /> <TextBlock Text="{Binding [Age]}" HorizontalAlignment="Left" VerticalAlignment="Center" /> </StackPanel> </StackPanel> </Border> </Border> </esri:GraphicsLayer.MapTip> </esri:GraphicsLayer> </esri:Map> <!-- Add a Button to perform the work. Note the Click Event handler is wired-up to use code-behind. --> <Button Content="Draw graphics from data in a file on disk" Height="35" HorizontalAlignment="Left" Margin="160,61,0,0" Name="Button3" VerticalAlignment="Top" Width="302" Click="Button1_Click"/> <!-- Provide the instructions on how to use the sample code. --> <TextBlock Height="40" HorizontalAlignment="Left" Name="TextBlock1" VerticalAlignment="Top" Width="616" TextWrapping="Wrap" Margin="12,12,0,0" Text="Click the button to load data in a textfile (.txt) on the local hard drive. The User Interface (UI) look and feel of the GraphicsLayer.MapTips are established in the XAML. Hover over a Graphic to see the MapTip." /> </Grid> | |
| C# | Copy Code |
|---|---|
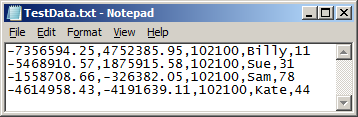
// SPECIAL INSTRUCTIONS: // This example code reads information from a textfile to display Graphics on the Map. Use a text editor // program (like Notepad) to add the following lines into the TestData.txt file and save it in the // \MyDocuments folder. NOTE: REMOVE THE STARTING COMMENT (' or //) BEFORE EACH LINE! // //-7356594.25,4752385.95,102100,Billy,11 //-5468910.57,1875915.58,102100,Sue,31 //-1558708.66,-326382.05,102100,Sam,78 //-4614958.43,-4191639.11,102100,Kate,44 // A simple Class that will hold all of the information to draw Graphics (with MapTips) on the Map Control. public class TestData { public int X; // X coordinate value public int Y; // Y coordinate value public int WKID; // The SpatialRefernce.WKID value public string Name; // An Attribute for a persons name public int Age; // An Attribute for a persons age } private void Button1_Click(object sender, System.Windows.RoutedEventArgs e) { // Create a List<TestData> objects that will contain all of the information needed to draw Graphics // with MapTips on the Map Control. List<TestData> theTestData = new List<TestData>(); // Load the List<TestData> objects from a textfile (.txt) on the local hard drive. theTestData = LoadTestData(); // Draw the Graphics (with configured MapTips) on the Map Control. DrawTestData2(theTestData); } public List<TestData> LoadTestData() { // This function will load data that is in a textfile (.txt) on the local hard drive into a // List<TestData> objects. // Create a new List<TestData>. List<TestData> theTestData = new List<TestData>(); // Create an instance of the open file dialog box. OpenFileDialog theOpenFileDialog = new OpenFileDialog(); // Set filter options and filter index. theOpenFileDialog.Filter = "Text Files (*.txt)|*.txt"; theOpenFileDialog.FilterIndex = 1; // Only let the user select one textfile at a time theOpenFileDialog.Multiselect = false; // Call the ShowDialog method to show the dialogbox. bool UserClickedOK = theOpenFileDialog.ShowDialog(); // Process input if the user clicked OK. if (UserClickedOK == true) { //Open the selected file to read. System.IO.Stream fileStream = theOpenFileDialog.File.OpenRead; // Use a StreamReader to read the contents of the textfile using (System.IO.StreamReader reader = new System.IO.StreamReader(fileStream)) { // Hold the contents of reading one line from the textfile. string line = null; // Loop through the textfile. do { // Read one line from the StreamReader line = reader.ReadLine(); // Only process valid content if (line != null) { // Break (tokenize) the contents of a line of information into a String Array. string[] parts = line.Split(','); // Create a new instance of one TestData object and populate the various fields. TestData oneRecord = new TestData(); oneRecord.X = parts[0]; oneRecord.Y = parts[1]; oneRecord.WKID = parts[2]; oneRecord.Name = parts[3]; oneRecord.Age = parts[4]; // Add the TestData object to the List<TestData>. theTestData.Add(oneRecord); } // Break out of the StreamReader if we don't have valid data. } while ( line != null); } // Close the Using logic flow. // Close the StreamReader. fileStream.Close(); } // Return the List<TestData>. return theTestData; } public void DrawTestData2(List<TestData> theTestData) { // Loop through all of the List<TestData> objects, construct Graphics with Attributes, and add the // Graphics to the GraphicsLayer to render on the Map Control. // Obtain the GraphicsLayer that was defined in XAML. Note: the look and feel of the MapTips are defined in // the XAML for the GraphicsLayer.MapTips. ESRI.ArcGIS.Client.GraphicsLayer theGraphicsLayer = null; theGraphicsLayer = (ESRI.ArcGIS.Client.GraphicsLayer)(Map1.Layers["MyGraphicsLayer"]); // Loop through the List<TestData> objects. foreach (TestData oneRecord in theTestData) { // Construct a new MapPoint geometric object from the TestData .X and .Y fields. ESRI.ArcGIS.Client.Geometry.MapPoint aMapPoint = new ESRI.ArcGIS.Client.Geometry.MapPoint(); aMapPoint.X = oneRecord.X; aMapPoint.Y = oneRecord.Y; // Construct a new SpatialReference object from a TestData.WKID field and use it for the MapPoint. ESRI.ArcGIS.Client.Geometry.SpatialReference aSpatialReference = new ESRI.ArcGIS.Client.Geometry.SpatialReference(oneRecord.WKID); aMapPoint.SpatialReference = aSpatialReference; // Create SimpleMarkerSymbol for the Graphic's Symbology. ESRI.ArcGIS.Client.Symbols.SimpleMarkerSymbol aSimpleMarkerSymbol = new ESRI.ArcGIS.Client.Symbols.SimpleMarkerSymbol(); aSimpleMarkerSymbol.Color = new System.Windows.Media.SolidColorBrush(Colors.Yellow); aSimpleMarkerSymbol.Style = ESRI.ArcGIS.Client.Symbols.SimpleMarkerSymbol.SimpleMarkerStyle.Diamond; aSimpleMarkerSymbol.Size = 12; // Create a new Graphic object and define its Geometry and Symbol Properties. ESRI.ArcGIS.Client.Graphic aGraphic = new ESRI.ArcGIS.Client.Graphic(); aGraphic.Geometry = (ESRI.ArcGIS.Client.Geometry.Geometry)aMapPoint; aGraphic.Symbol = (ESRI.ArcGIS.Client.Symbols.Symbol)aSimpleMarkerSymbol; // Define two Graphic.Attribute Properties from the TestData object. You could have defined more // Attributes but this was sufficient for the sample. aGraphic.Attributes.Add("Name", oneRecord.Name); aGraphic.Attributes.Add("Age", oneRecord.Age); // Add the Graphic to the GraphicsLayer. theGraphicsLayer.Graphics.Add(aGraphic); } } | |
| VB.NET | Copy Code |
|---|---|
' SPECIAL INSTRUCTIONS: ' This example code reads information from a textfile to display Graphics on the Map. Use a text editor ' program (like Notepad) to add the following lines into the TestData.txt file and save it in the ' \MyDocuments folder. NOTE: REMOVE THE STARTING COMMENT (' or //) BEFORE EACH LINE! ' '-7356594.25,4752385.95,102100,Billy,11 '-5468910.57,1875915.58,102100,Sue,31 '-1558708.66,-326382.05,102100,Sam,78 '-4614958.43,-4191639.11,102100,Kate,44 ' A simple Class that will hold all of the information to draw Graphics (with MapTips) on the Map Control. Public Class TestData Public X As Integer ' X coordinate value Public Y As Integer ' Y coordinate value Public WKID As Integer ' The SpatialRefernce.WKID value Public Name As String ' An Attribute for a persons name Public Age As Integer ' An Attribute for a persons age End Class Private Sub Button1_Click(ByVal sender As System.Object, ByVal e As System.Windows.RoutedEventArgs) ' Create a List(Of TestData) objects that will contain all of the information needed to draw Graphics ' with MapTips on the Map Control. Dim theTestData As New List(Of TestData) ' Load the List(Of TestData) objects from a textfile (.txt) on the local hard drive. theTestData = LoadTestData() ' Draw the Graphics (with configured MapTips) on the Map Control. DrawTestData2(theTestData) End Sub Public Function LoadTestData() As List(Of TestData) ' This function will load data that is in a textfile (.txt) on the local hard drive into a ' List(Of TestData) objects. ' Create a new List(Of TestData). Dim theTestData As New List(Of TestData) ' Create an instance of the open file dialog box. Dim theOpenFileDialog As OpenFileDialog = New OpenFileDialog ' Set filter options and filter index. theOpenFileDialog.Filter = "Text Files (*.txt)|*.txt" theOpenFileDialog.FilterIndex = 1 ' Only let the user select one textfile at a time theOpenFileDialog.Multiselect = False ' Call the ShowDialog method to show the dialogbox. Dim UserClickedOK As Boolean = theOpenFileDialog.ShowDialog ' Process input if the user clicked OK. If (UserClickedOK = True) Then 'Open the selected file to read. Dim fileStream As System.IO.Stream = theOpenFileDialog.File.OpenRead ' Use a StreamReader to read the contents of the textfile Using reader As New System.IO.StreamReader(fileStream) ' Hold the contents of reading one line from the textfile. Dim line As String ' Loop through the textfile. Do ' Read one line from the StreamReader line = reader.ReadLine() ' Only process valid content If line IsNot Nothing Then ' Break (tokenize) the contents of a line of information into a String Array. Dim parts As String() = Split(line, ",") ' Create a new instance of one TestData object and populate the various fields. Dim oneRecord As New TestData oneRecord.X = parts(0) oneRecord.Y = parts(1) oneRecord.WKID = parts(2) oneRecord.Name = parts(3) oneRecord.Age = parts(4) ' Add the TestData object to the List(of TestData). theTestData.Add(oneRecord) End If ' Break out of the StreamReader if we don't have valid data. Loop Until line Is Nothing End Using ' Close the Using logic flow. ' Close the StreamReader. fileStream.Close() End If ' Return the List(Of TestData). Return theTestData End Function Public Sub DrawTestData2(ByVal theTestData As List(Of TestData)) ' Loop through all of the List(Of TestData) objects, construct Graphics with Attributes, and add the ' Graphics to the GraphicsLayer to render on the Map Control. ' Obtain the GraphicsLayer that was defined in XAML. Note: the look and feel of the MapTips are defined in ' the XAML for the GraphicsLayer.MapTips. Dim theGraphicsLayer As ESRI.ArcGIS.Client.GraphicsLayer theGraphicsLayer = CType(Map1.Layers("MyGraphicsLayer"), ESRI.ArcGIS.Client.GraphicsLayer) ' Loop through the List(Of TestData) objects. Dim oneRecord As TestData For Each oneRecord In theTestData ' Construct a new MapPoint geometric object from the TestData .X and .Y fields. Dim aMapPoint As New ESRI.ArcGIS.Client.Geometry.MapPoint aMapPoint.X = oneRecord.X aMapPoint.Y = oneRecord.Y ' Construct a new SpatialReference object from a TestData.WKID field and use it for the MapPoint. Dim aSpatialReference As New ESRI.ArcGIS.Client.Geometry.SpatialReference(oneRecord.WKID) aMapPoint.SpatialReference = aSpatialReference ' Create SimpleMarkerSymbol for the Graphic's Symbology. Dim aSimpleMarkerSymbol As New ESRI.ArcGIS.Client.Symbols.SimpleMarkerSymbol aSimpleMarkerSymbol.Color = New System.Windows.Media.SolidColorBrush(Colors.Yellow) aSimpleMarkerSymbol.Style = ESRI.ArcGIS.Client.Symbols.SimpleMarkerSymbol.SimpleMarkerStyle.Diamond aSimpleMarkerSymbol.Size = 12 ' Create a new Graphic object and define its Geometry and Symbol Properties. Dim aGraphic As New ESRI.ArcGIS.Client.Graphic aGraphic.Geometry = CType(aMapPoint, ESRI.ArcGIS.Client.Geometry.Geometry) aGraphic.Symbol = CType(aSimpleMarkerSymbol, ESRI.ArcGIS.Client.Symbols.Symbol) ' Define two Graphic.Attribute Properties from the TestData object. You could have defined more ' Attributes but this was sufficient for the sample. aGraphic.Attributes.Add("Name", oneRecord.Name) aGraphic.Attributes.Add("Age", oneRecord.Age) ' Add the Graphic to the GraphicsLayer. theGraphicsLayer.Graphics.Add(aGraphic) Next End Sub | |
Requirements
Target Platforms: Windows XP Professional, Windows Server 2003 family, Windows Vista, Windows Server 2008 family, Windows 7, Windows 8