


 Syntax
| Visual Basic (Declaration) | |
|---|---|
Public Property Url As String | |
| C# | |
|---|---|
public string Url {get; set;} | |
Remarks
The CSV file format is tabular data in plain text. The data in the CSV file consists of fields of data separated by a delimiting character (typically a comma) for a record. The first record in the CSV file is known as the header and defines the names of each field of the tabular data. The second through last row of records in the CSV file is the actual tabular data. When the delimiter (typically a comma) is embedded in the tabular data for a particular field, that value should be encased in quotes to avoid parsing errors. Each record in the CSV file should contain the same number of fields. Numerous applications including the Microsoft Excel Office product can export and import CSV files. It is not required that a CSV source file contain the extension .csv; the file can contain any extension (ex: .txt) or none at all.
If it is desired to obtain the CSV data from a Stream rather than the Url Property use the SetSource Method.
The bare minimum settings that need to be specified to create and display a CsvLayer in a Map are the Url and Renderer Properties (Url methadology) OR the SetSource and Renderer Properties (Stream methodology). NOTE: This assumes that default spatial coordinate information field names are used and the delimiter for the CSV file is a comma.
There are several methods to construct a Url for accessing data in a CSV layer. The example code in the CsvLayer Class documentation shows how to access a CSV file via on a web server and uses the 'http://' keyword to construct a Url. The example code in the CsvLayer.Url Property documentation shows how to access a CSV file as a resource on the local disk in a Visual Studio project using the '[Visual_Studio_Project_Name]' and the 'component' keywords. Even more options are available such as constructing a Url using the 'file://' or 'pack://' keywords. The development platform you are coding in will determine which style of Url is appropriate. See the documentation for your particular development platform to decide which type of string can be used in the the Url construction.
Example
How to use:
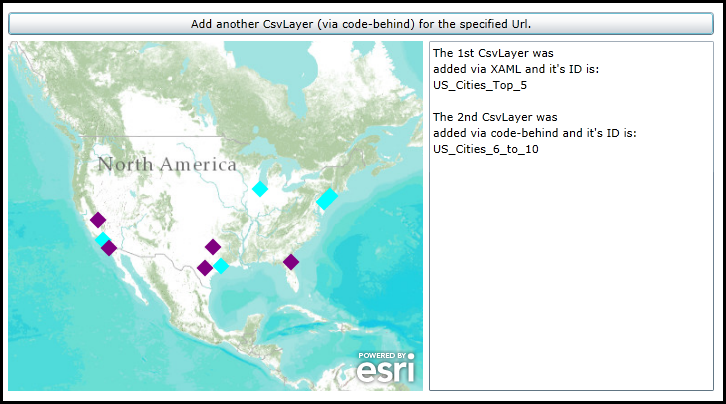
When the application loads a CsvLayer will automatically be added to the Map (it was specified in XAML). Click the Button to add another CsvLayer to the Map (it will be added via code-behind). The ID of each layer will displayed in the TextBox. NOTE: the CSV files are accessed via Resource files on disk in the Visual Studio project rather that an http:// web service.
The XAML code in this example is used in conjunction with the code-behind (C# or VB.NET) to demonstrate the functionality.
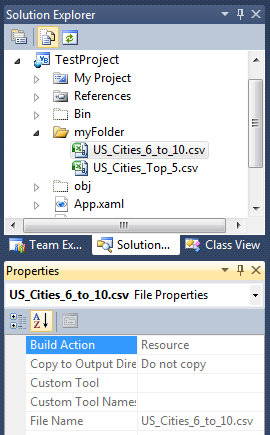
SPECIAL INSTRUCTIONS: The name of the sample Visual Studio project in this code example is "TestProject". Additionally a folder named "myFolder" was added to "TestProject". Place the "US_Cities_Top_5.csv" and the "US_Cities_6_to_10.csv" files in the "myFolder" location. Make sure that the for the Properties of the "US_Cities_Top_5.csv" and "US_Cities_6_to_10.csv" files that the 'Build Action' is set to 'Resource'.
The following is an example of the ASCII contents for the file named US_Cities_Top_5.csv:
ID,Lat,Long,CityName,Population
1,40.714,-74.006,New York City,8244910
2,34.0522,-118.244,Los Angeles,3819702
3,41.878,-87.636,Chicago,2708120
4,29.763,-95.363,Houston,2099451
5,39.952,-75.168,Philadelphia,1526006
The following is an example of the ASCII contents for the file named US_Cities_6_to_10.csv:
ID,Lat,Long,CityName,Population
6,29.423,-98.493,San Antonio,1327407
7,32.715,-117.156,San Diego,1326179
8,32.782,-96.815,Dallas,1223229
9,37.228,-119.228,San Jose,945942
10,30.331,-81.655,Jacksonville,821784
The following screen shot corresponds to the code example in this page.
| XAML |  Copy Code Copy Code |
|---|---|
<Grid x:Name="LayoutRoot" > <!-- Add local Resources to define a SimpleRender to display aqua diamonds as a SimpleMarkerSymbol for the CsvLayer. --> <Grid.Resources> <esri:SimpleRenderer x:Key="myRenderer"> <esri:SimpleRenderer.Symbol> <esri:SimpleMarkerSymbol Color="Red" Size="12" Style="Circle" /> </esri:SimpleRenderer.Symbol> </esri:SimpleRenderer> </Grid.Resources> <!-- Add a Map Control to the application. Set the Extent to North America. --> <esri:Map x:Name="Map1" HorizontalAlignment="Left" VerticalAlignment="Top" Margin="0,238,0,0" Height="350" Width="415" Extent="-15219969,2609636,-6232883,6485365"> <!-- Add a backdrop ArcGISTiledMapServiceLayer. --> <esri:ArcGISTiledMapServiceLayer ID="World_Topo_Map" Url="http://services.arcgisonline.com/arcgis/rest/services/world_topo_map/MapServer" /> <!-- Add a CsvLayer. The renderer symbology will be based upon the local static resource defined above. VERY IMPORTANT: Replace the first parameter argument of the Url with the correct string to the location of the CSV file relative to your test project. In this example the Visual Studio project name is: "TestProject". Additionally, a folder was added to "TestProject" called "myFolder" and this is where the US_Cities_Top_5.csv file is located. Finally, make sure that the for the Properties of the US_Cities_Top_5.csv file that the 'Build Action' is set to 'Resource'. --> <esri:CsvLayer ID="US_Cities_Top_5" Url="/TestProject;component/myFolder/US_Cities_Top_5.csv" Renderer="{StaticResource myRenderer}" Initialized="CsvLayer_Initialized"/> </esri:Map> <!-- Add a Button that will allow the user to add another CsvLayer via code-behind. --> <Button Name="Button1" Height="23" HorizontalAlignment="Left" Margin="0,209,0,0" VerticalAlignment="Top" Width="706" Content="Add another CsvLayer (via code-behind) for the specified Url." Click="Button1_Click" /> <!-- TextBox to display information about about the CsvLayerLayers added to the Map. --> <TextBox Height="350" HorizontalAlignment="Left" Margin="421,238,0,0" Name="TextBox1" VerticalAlignment="Top" Width="285" /> <!-- Provide the instructions on how to use the sample code. --> <TextBlock Height="174" HorizontalAlignment="Left" Name="TextBlock1" VerticalAlignment="Top" Width="788" TextWrapping="Wrap" Text="When the application loads a CsvLayer will automatically be added to the Map (it was specified in XAML). Click the Button to add another CsvLayer to the Map (it will be added via code-behind). The ID of each layer will displayed in the TextBox. NOTE: the CSV files are accessed via Resource files on disk in the Visual Studio project rather that an http:// web service." /> </Grid> | |
| C# | Copy Code |
|---|---|
private void CsvLayer_Initialized(object sender, System.EventArgs e) { // This function will execute as a result of the CsvLayer that was defined in XAML being Initialized. // Get the CsvLayer. ESRI.ArcGIS.Client.Toolkit.DataSources.CsvLayer myCsvLayer = (ESRI.ArcGIS.Client.Toolkit.DataSources.CsvLayer)sender; // Get the ID of the CsvLayer. string myID = myCsvLayer.ID; // Create a StringBuilder object to hold information about the CsvLayer and add some useful information to it. System.Text.StringBuilder myStringBuilder = new System.Text.StringBuilder(); myStringBuilder.Append("The 1st CsvLayer was" + Environment.NewLine); myStringBuilder.Append("added via XAML and it's ID is: " + Environment.NewLine); myStringBuilder.Append(myID); // Display the results of the StringBuilder text to the user. TextBox1.Text = myStringBuilder.ToString(); } private void Button1_Click(object sender, System.Windows.RoutedEventArgs e) { // This function executes as a result of the user clicking the Button. It adds a CsvLayer using code-behind. // Create a CsvLayer. ESRI.ArcGIS.Client.Toolkit.DataSources.CsvLayer myCsvLayer2 = new ESRI.ArcGIS.Client.Toolkit.DataSources.CsvLayer(); // Set the Url of the CsvLayer to a public service. // VERY IMPORTANT: // Replace the first parameter argument of the Url with the correct string to the location of the CSV // file relative to your test project. In this example the Visual Studio project name is: "TestProject". // Additionally, a folder was added to "TestProject" called "myFolder" and this is where the US_Cities_6_to_10.csv // file is located. Finally, make sure that the for the Properties of the US_Cities_6_to_10.csv file that the // 'Build Action' is set to 'Resource'. myCsvLayer2.Url = "/TestProject;component/myFolder/US_Cities_6_to_10.csv"; // Set the ID of the CsvLayer. myCsvLayer2.ID = "US_Cities_6_to_10"; // Create a SimpleMarkerSymbol (a purple diamond) for the CsvLayer that will be added. ESRI.ArcGIS.Client.Symbols.SimpleMarkerSymbol theSimpleMarkerSymbol = new ESRI.ArcGIS.Client.Symbols.SimpleMarkerSymbol(); theSimpleMarkerSymbol.Color = new System.Windows.Media.SolidColorBrush(System.Windows.Media.Colors.Purple); theSimpleMarkerSymbol.Size = 12; theSimpleMarkerSymbol.Style = ESRI.ArcGIS.Client.Symbols.SimpleMarkerSymbol.SimpleMarkerStyle.Diamond; // Define a SimpleRenderer and set the Symbol to the SimpleMarkerSymbol. ESRI.ArcGIS.Client.SimpleRenderer theSimpleRenderer = new ESRI.ArcGIS.Client.SimpleRenderer(); theSimpleRenderer.Symbol = theSimpleMarkerSymbol; // Define the Renderer for the CsvLayer. myCsvLayer2.Renderer = theSimpleRenderer; // Wire-up the Initialized Event of the CsvLayer. Note how a different Initilized Event is being used verses // the one defined in XAML. They could share the same Initialized Event but we created two seperate ones // for demonstration purposes. myCsvLayer2.Initialized += CsvLayer_Initialized2; // Add the CsvLayer to the Map. Map1.Layers.Add(myCsvLayer2); } private void CsvLayer_Initialized2(object sender, EventArgs e) { // This function will execute as a result of the CsvLayer that was defined in code-behind being Initialized. // Get the CsvLayer. ESRI.ArcGIS.Client.Toolkit.DataSources.CsvLayer myCsvLayer2 = (ESRI.ArcGIS.Client.Toolkit.DataSources.CsvLayer)sender; // Get the ID of the CsvLayer. string myID2 = myCsvLayer2.ID; // Create a StringBuilder object to hold information about the CsvLayer and add some useful information to it. System.Text.StringBuilder myStringBuilder = new System.Text.StringBuilder(); myStringBuilder.Append(TextBox1.Text + Environment.NewLine); myStringBuilder.Append(Environment.NewLine); myStringBuilder.Append("The 2nd CsvLayer was" + Environment.NewLine); myStringBuilder.Append("added via code-behind and it's ID is: " + Environment.NewLine); myStringBuilder.Append(myID2); // Display the results of the StringBuilder text to the user. TextBox1.Text = myStringBuilder.ToString(); } | |
| VB.NET | Copy Code |
|---|---|
Private Sub CsvLayer_Initialized(sender As System.Object, e As System.EventArgs) ' This function will execute as a result of the CsvLayer that was defined in XAML being Initialized. ' Get the CsvLayer. Dim myCsvLayer As ESRI.ArcGIS.Client.Toolkit.DataSources.CsvLayer = CType(sender, ESRI.ArcGIS.Client.Toolkit.DataSources.CsvLayer) ' Get the ID of the CsvLayer. Dim myID As String = myCsvLayer.ID ' Create a StringBuilder object to hold information about the CsvLayer and add some useful information to it. Dim myStringBuilder As New Text.StringBuilder myStringBuilder.Append("The 1st CsvLayer was" + vbCrLf) myStringBuilder.Append("added via XAML and it's ID is: " + vbCrLf) myStringBuilder.Append(myID) ' Display the results of the StringBuilder text to the user. TextBox1.Text = myStringBuilder.ToString End Sub Private Sub Button1_Click(sender As System.Object, e As System.Windows.RoutedEventArgs) ' This function executes as a result of the user clicking the Button. It adds a CsvLayer using code-behind. ' Create a CsvLayer. Dim myCsvLayer2 As ESRI.ArcGIS.Client.Toolkit.DataSources.CsvLayer = New ESRI.ArcGIS.Client.Toolkit.DataSources.CsvLayer ' Set the Url of the CsvLayer to a public service. ' VERY IMPORTANT: ' Replace the first parameter argument of the Url with the correct string to the location of the CSV ' file relative to your test project. In this example the Visual Studio project name is: "TestProject". ' Additionally, a folder was added to "TestProject" called "myFolder" and this is where the US_Cities_6_to_10.csv ' file is located. Finally, make sure that the for the Properties of the US_Cities_6_to_10.csv file that the ' 'Build Action' is set to 'Resource'. myCsvLayer2.Url = "/TestProject;component/myFolder/US_Cities_6_to_10.csv" ' Set the ID of the CsvLayer. myCsvLayer2.ID = "US_Cities_6_to_10" ' Create a SimpleMarkerSymbol (a purple diamond) for the CsvLayer that will be added. Dim theSimpleMarkerSymbol As ESRI.ArcGIS.Client.Symbols.SimpleMarkerSymbol = New ESRI.ArcGIS.Client.Symbols.SimpleMarkerSymbol theSimpleMarkerSymbol.Color = New System.Windows.Media.SolidColorBrush(System.Windows.Media.Colors.Green) theSimpleMarkerSymbol.Size = 12 theSimpleMarkerSymbol.Style = ESRI.ArcGIS.Client.Symbols.SimpleMarkerSymbol.SimpleMarkerStyle.Circle ' Define a SimpleRenderer and set the Symbol to the SimpleMarkerSymbol. Dim theSimpleRenderer As ESRI.ArcGIS.Client.SimpleRenderer = New ESRI.ArcGIS.Client.SimpleRenderer theSimpleRenderer.Symbol = theSimpleMarkerSymbol ' Define the Renderer for the CsvLayer. myCsvLayer2.Renderer = theSimpleRenderer ' Wire-up the Initialized Event of the CsvLayer. Note how a different Initilized Event is being used verses ' the one defined in XAML. They could share the same Initialized Event but we created two seperate ones ' for demonstration purposes. AddHandler myCsvLayer2.Initialized, AddressOf CsvLayer_Initialized2 ' Add the CsvLayer to the Map. Map1.Layers.Add(myCsvLayer2) End Sub Private Sub CsvLayer_Initialized2(sender As Object, e As EventArgs) ' This function will execute as a result of the CsvLayer that was defined in code-behind being Initialized. ' Get the CsvLayer. Dim myCsvLayer2 As ESRI.ArcGIS.Client.Toolkit.DataSources.CsvLayer = CType(sender, ESRI.ArcGIS.Client.Toolkit.DataSources.CsvLayer) ' Get the ID of the CsvLayer. Dim myID2 As String = myCsvLayer2.ID ' Create a StringBuilder object to hold information about the CsvLayer and add some useful information to it. Dim myStringBuilder As New Text.StringBuilder myStringBuilder.Append(TextBox1.Text + vbCrLf) myStringBuilder.Append(vbCrLf) myStringBuilder.Append("The 2nd CsvLayer was" + vbCrLf) myStringBuilder.Append("added via code-behind and it's ID is: " + vbCrLf) myStringBuilder.Append(myID2) ' Display the results of the StringBuilder text to the user. TextBox1.Text = myStringBuilder.ToString End Sub | |
Requirements
Target Platforms: Windows XP Professional, Windows Server 2003 family, Windows Vista, Windows Server 2008 family, Windows 7, Windows 8