


 Syntax
| Visual Basic (Declaration) | |
|---|---|
Public Property CustomTextElements As IDictionary(Of String,String) | |
| C# | |
|---|---|
public IDictionary<string,string> CustomTextElements {get; set;} | |
Remarks
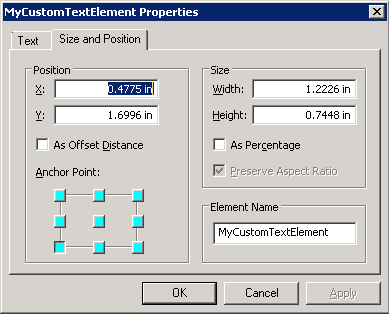
In order to programmatically change a generic Text Element in the marginalia of a map from the client, first a custom Layout Template must be created using ArcMap. The author of the Layout Template .mxd file must share with the developer the Element Name of the inserted Text Element so that this can be used in constructing the Dictionary that is passed to the Printing.LayoutOptions.CustomTextElements Property. The following is a screen shot of the Properties dialog for a Text Element that was added to the Layout View design surface of a Layout Template .mxd file (note that the Element Name is "MyCustomTextElement"):
And the corresponding code snippet to programmatically change the Text Element when using the PrintTask:
C#
            ESRI.ArcGIS.Client.Printing.PrintParameters myPrintParameters = new ESRI.ArcGIS.Client.Printing.PrintParameters(MyMap);
            ...
            ESRI.ArcGIS.Client.Printing.LayoutOptions myLayoutOptions = new ESRI.ArcGIS.Client.Printing.LayoutOptions();
            Dictionary<string, string> myCustomElements = new Dictionary<string, string>();

            // The "MyCustomTextElement" is the Element Name in the Layout Template .mxd file.
            myCustomElements.Add("MyCustomTextElement", "LOOK I CAN CHANGE THIS STRING");
            myLayoutOptions.CustomTextElements = myCustomElements;
            ...
            myPrintParameters.LayoutOptions = myLayoutOptions;
VB.NET
            Dim myPrintParameters As New ESRI.ArcGIS.Client.Printing.PrintParameters(MyMap)
            ...
            Dim myLayoutOptions As New ESRI.ArcGIS.Client.Printing.LayoutOptions
            Dim myCustomElements As New Dictionary(Of String, String)

            ' The "MyCustomTextElement" is the Element Name in the Layout Template .mxd file.
            myCustomElements.Add("MyCustomTextElement", "LOOK I CAN CHANGE THIS STRING")
            myLayoutOptions.CustomTextElements = myCustomElements
            ...
            myPrintParameters.LayoutOptions = myLayoutOptions
Property Value
The custom text elements.Example
The following steps show one example workflow of how a developer could create a custom Layout Template in which a Text Element (that can be modified by the LayoutOptions.CustomTextElements Property) and some other graphic Elements are added. For this workflow it is assumed that ArcMap, ArcGIS Server, and Visual Studio are installed on the same machine. The machine name used in this example is called DK-RED2A but you will need to substitute you own machine name to follow along.
Step 1: Author the Layout Template in ArcMap
-
Start ArcMap.
-
Switch to the Layout View (a Data Frame Element will already be provided on the design surface).
-
Add the following graphic Elements onto the design surface and ensure they have the following specific Properties being set:
-
Text (Ensure the Element Name is "MyCustomTextElement".)
-
North Arrow (No specific property changes are necessary.)
-
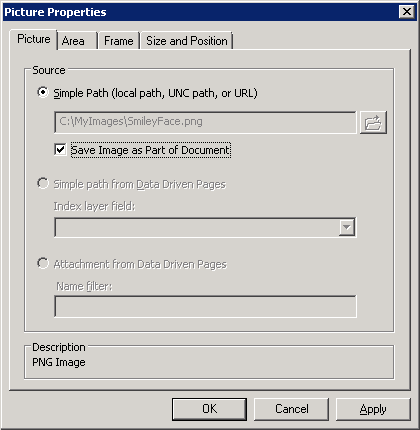
Picture (Ensure the check box is checked on for the Save Image as Part of Document. Use any test image you have available for the Source.)
-
-
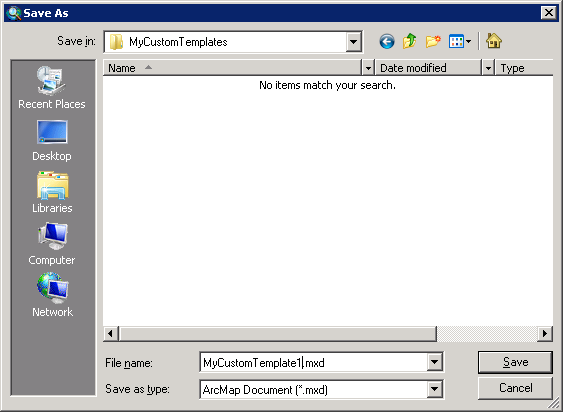
Save the ArcMap Layout Template document as C:\MyCustomTemplates\MyCustomTemplate1.mxd:
-
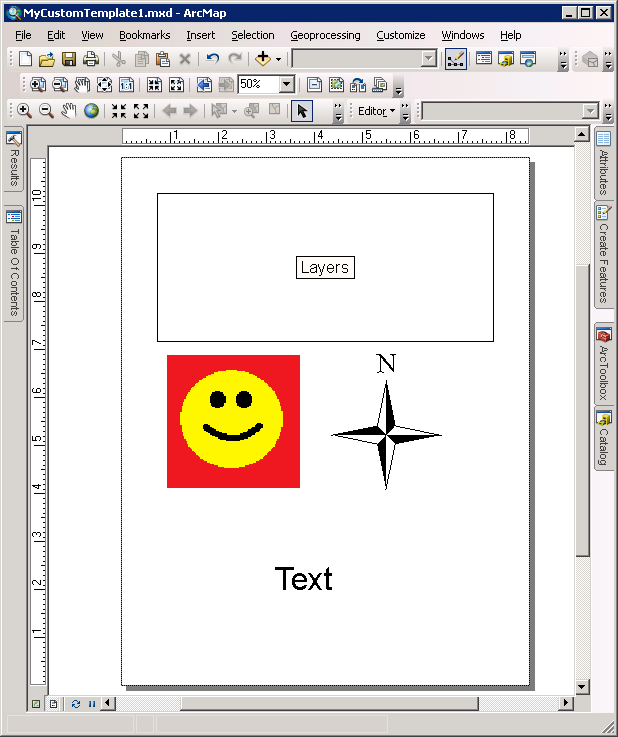
Resize and move the graphic Elements around until it looks similar to the following screen shot and then re-save the project:
Step2: Publish the Layout Template on ArcGIS Server
-
In ArcMap, open ArcToolbox, expand the Server Tools | Printing nodes and double click on the Export Web Map tool:

-
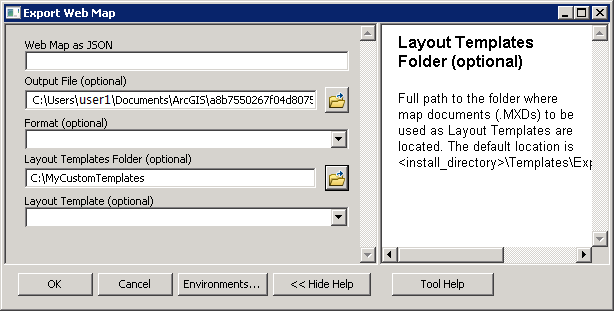
In the Export Web Map dialog that opens: (1) delete what is currently set for the image Format (this will enable any valid image type to be specified via the Printing.PrintParameters.Format Property); (2) click the folder icon in the Layout Template Folder section and set it to the location of where the custom Layout Template .mxd was stored (C:\MyCustomTemplates in this example); (3) Then click OK. This will begin the process of creating the Export Web Map service:
-
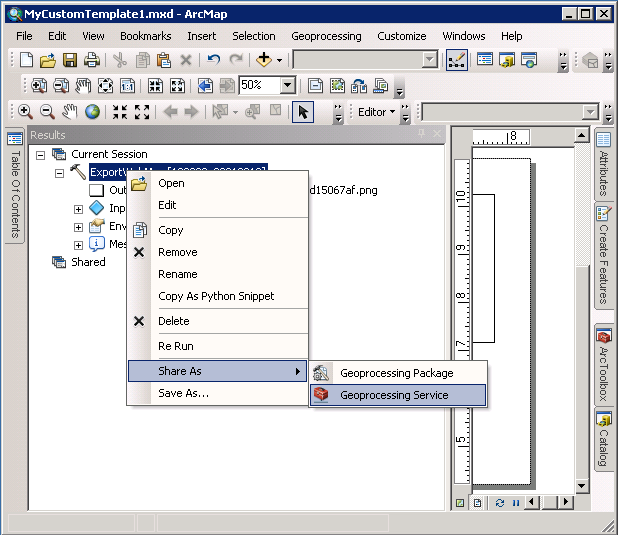
When the Export Web Map Geoprocessing task is done, open the Results tab, and expand the Current Session | ExportWebMap nodes. Then right click on the ExportWebMap node and choose Share As | GeoProcessing Service from the context menus:
-
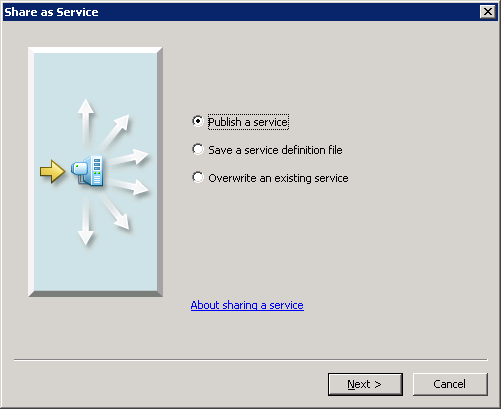
This will open the Share as Service dialog to publish the ExportWebMap Task on ArcGIS Server. Make sure the Publish a service radio button is checked and click the Next buton:
-
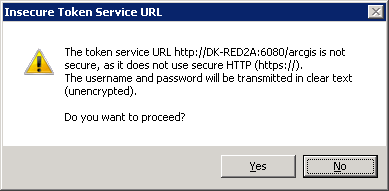
In the Insecure Token Service URL dialog choose Yes (this example does not use secure token services):
-
If the GIS Server Connection dialog appears specify the correct User Name and Password for the ArcGIS Server:

-
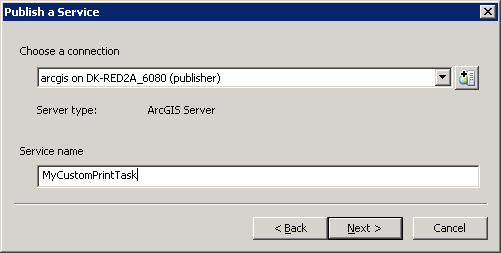
When the Publish a Service dialog opens, choose the correct Connection for ArcGIS Server and specify the Service name as "MyCustomPrintTask" (we will discover the Url for this ExportWebMap PrintTask later):
-
Accept the default values of Use existing folder and click the Continue button:

-
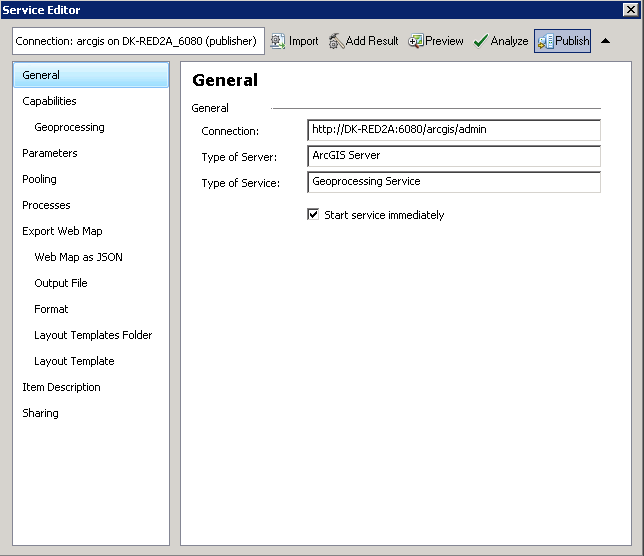
In the Service Editor dialog, accept the default options and click the Publish button in the upper right corner (Note: by default this will create an asynchronous Execution Mode service):
-
If the GIS Server Connection dialog appears specify the correct User Name and Password for the ArcGIS Server:
-
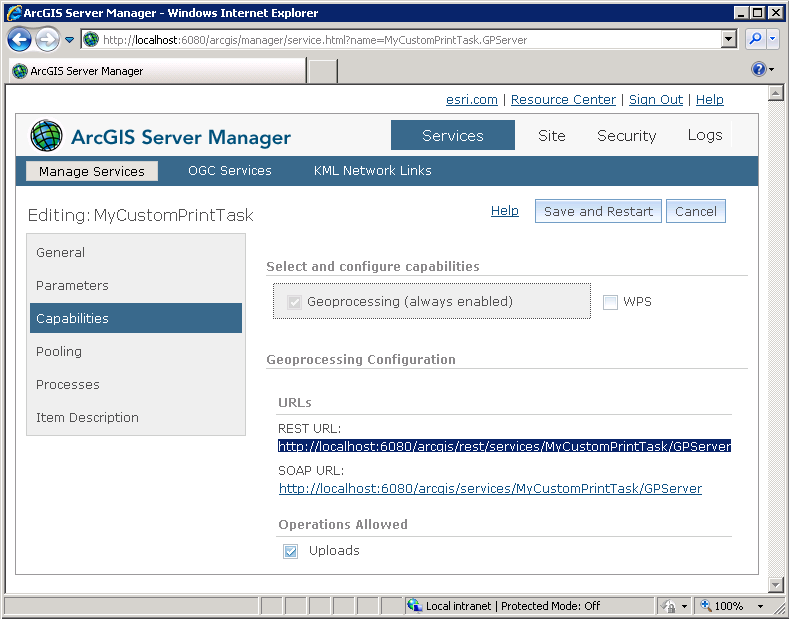
At this point the service should be created successfully. You can obtain the REST URL of the ExportWebMap PrintTask service from the ArcGIS Server Manager:
-
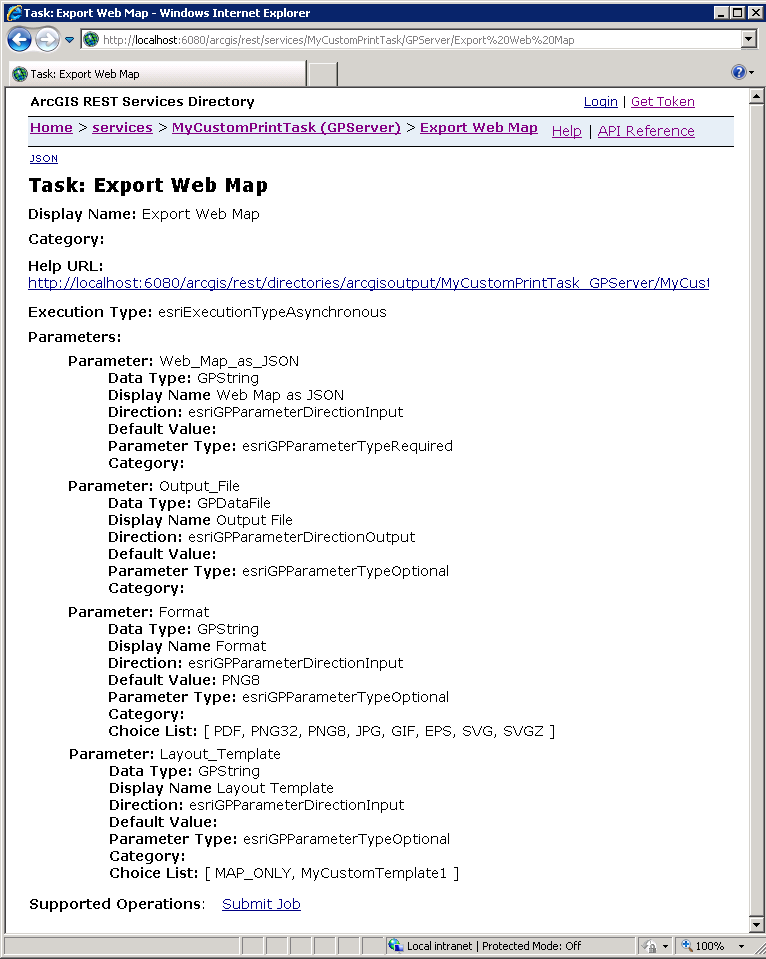
Using the REST URL string from the prior screen shot, copy it into the address bar of your internet browser. The developer should be able to access the public site for the ExportWebMap task via the ArcGIS REST Service Directory. You should be able to see that the Layout_Template parameter uses the custom Layout Template .mxd file named "MyCustomTemplate1":
Step 3: Create a Visual Studio test project and write the code to generate a map based upon the custom Layout Template
-
Launch Visual Studio 2010.
-
Choose File | New Project from the Visual Studio menus.
-
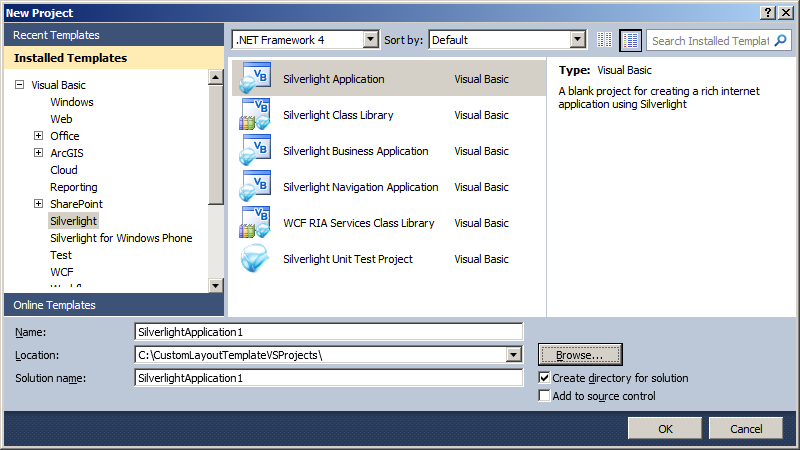
In the New Project dialog, expand .NET Language of your choice (Visual Basic shown in this example), click on the Silverlight Template, choose Silverlight Application, and specify the following information in the textboxes:
-
Name: SilverlightApplication1
-
Location: C:\CustomLayoutTemplateVSProjects\
-
Solution name: SilverlightApplication1
The Visual Studio project should look similar to the followwing:
-
-
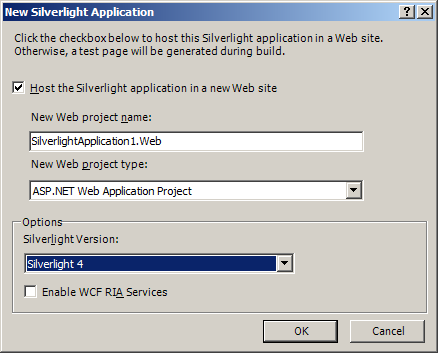
In the New Silverlight Application dialog, accept the defaults (make sure the Host the Silverlight application in a new Web site is checked). This will use the Visual Studio built-in web server (Cassini) for launching your Silverlight application
-
Drag an ESRI Silverlight API Map Control onto the MainPage.xaml design surface:
-
Add the following additional References to the Visual Studio Project: ESRI.ArcGIS.Client.Printing and System.Windows.Controls.Data.Input.
-
Replace the XAML code in the MainPage.xaml with the following:
<UserControl x:Class="SilverlightApplication1.MainPage" xmlns="http://schemas.microsoft.com/winfx/2006/xaml/presentation" xmlns:x="http://schemas.microsoft.com/winfx/2006/xaml" xmlns:d="http://schemas.microsoft.com/expression/blend/2008" xmlns:mc="http://schemas.openxmlformats.org/markup-compatibility/2006" mc:Ignorable="d" d:DesignHeight="650" d:DesignWidth="650" xmlns:esri="http://schemas.esri.com/arcgis/client/2009" xmlns:sdk="http://schemas.microsoft.com/winfx/2006/xaml/presentation/sdk"> <Grid x:Name="LayoutRoot" Background="White"> <!-- Add a Map Control. Zoom to the Continental United States. --> <esri:Map Background="White" HorizontalAlignment="Left" Margin="47,256,0,0" VerticalAlignment="Top" Name="MyMap" WrapAround="True" Height="300" Width="566" BorderBrush="Black" BorderThickness="1" Extent="-15582663,1650611,-5474071,6991676"> <esri:Map.Layers> <esri:LayerCollection> <!-- Add an ArcGISDynamicMapServiceLayer as a backdrop. --> <esri:ArcGISDynamicMapServiceLayer ID="World_Light_Gray_Base" Url="http://services.arcgisonline.com/ArcGIS/rest/services/Canvas/World_Light_Gray_Base/MapServer"/> </esri:LayerCollection> </esri:Map.Layers> </esri:Map> <!-- Get the PrintTask.Url. --> <sdk:Label Height="20" HorizontalAlignment="Left" Margin="8,100,0,0" Name="Label_Url" VerticalAlignment="Top" Width="31" Content="Url:"/> <TextBox Height="23" HorizontalAlignment="Left" Margin="8,118,0,0" Name="TextBox_Url" VerticalAlignment="Top" Width="562" FontSize="10" /> <!-- Add a button to perform the work. --> <Button Content="Make a map using my custom Layout Template" Height="23" HorizontalAlignment="Left" Margin="14,147,0,0" Name="Button1" VerticalAlignment="Top" Width="282" Click="Button1_Click"/> <!-- Give the user options to specify different: Layout Templates, image Formats, and CustomTextElement information for the output PrintTask operation. --> <sdk:Label Height="19" Margin="12,178,0,0" Name="Label_LayoutTemplate" VerticalAlignment="Top" Content="Layout Template:" HorizontalAlignment="Left" Width="111" /> <TextBlock Height="19" HorizontalAlignment="Left" Margin="122,178,0,0" Name="TextBlock_LayoutTemplate" VerticalAlignment="Top" Width="163" Text="MyCustomTemplate1"/> <sdk:Label Height="19" HorizontalAlignment="Left" Margin="11,194,0,0" Name="Label_Format" VerticalAlignment="Top" Width="52" Content="Format:"/> <TextBlock Height="19" HorizontalAlignment="Left" Margin="59,194,0,0" Name="TextBlock_Format" VerticalAlignment="Top" Width="226" Text="PDF"/> <sdk:Label Height="19" HorizontalAlignment="Left" Margin="12,212,0,0" Name="Label_CustomTextElement" VerticalAlignment="Top" Width="120" Content="CustomTextElement:"/> <TextBlock Height="19" HorizontalAlignment="Left" Margin="138,212,0,0" Name="TextBlock_CustomTextElement" VerticalAlignment="Top" Width="147" Text="Dude wheres my car!"/> <!-- Display the current JobInfo to the user about the status of the asynchronous PrintTask. --> <sdk:Label Height="16" HorizontalAlignment="Left" Margin="315,147,0,0" Name="Label_JobId" VerticalAlignment="Top" Width="35" Content="JobId:"/> <TextBlock Height="16" HorizontalAlignment="Left" Margin="356,147,0,0" Name="TextBlock_JobId" VerticalAlignment="Top" Width="256" /> <sdk:Label Height="15" Margin="291,169,0,0" Name="Label_JobStatus" VerticalAlignment="Top" Content="JobStatus:" HorizontalAlignment="Left" Width="65" /> <TextBlock Height="15" Margin="356,169,187,0" Name="TextBlock_JobStatus" VerticalAlignment="Top" /> <sdk:Label Height="23" HorizontalAlignment="Left" Margin="291,186,0,0" Name="Label_Messages" VerticalAlignment="Top" Width="65" Content="Messages:"/> <ListBox Height="64" HorizontalAlignment="Left" Margin="356,186,0,0" Name="ListBox_Messages" VerticalAlignment="Top" Width="256" /> <!-- Provide the instructions on how to use the sample code. --> <TextBlock Height="94" HorizontalAlignment="Left" Name="TextBlock1" VerticalAlignment="Top" Width="480" TextWrapping="Wrap" Text= "When the application loads, enter a correct Url to an ArcGIS Server PrintTask based on an 'asynchronous geoprocessing task'. Use the default options (or specify your own) for generating an output map using the parameters of: Layout Template, image Format, and CustomTextElement. Then click the 'Make a map using my custom Layout Template' button to generate the output." /> </Grid> </UserControl> -
Replace the MainPage.xaml.vb or MainPage.xaml.cs with the following:
C#:
               public partial class MainPage : UserControl
               {
                // Create Global (aka. Member) variable for the PrintTask object that will be
                // used in other parts of the application.
                public ESRI.ArcGIS.Client.Printing.PrintTask _PrintTask;

                public MainPage()
                {
                 InitializeComponent();

                 // Provide a valid PrintTask.Url for a "asynchronous geoprocessing task"
                 TextBox_Url.Text = "http://localhost:6080/arcgis/rest/services/MyCustomPrintTask/GPServer/Export20Web20Map";

                 // Set the _PrintTask variable to a new instance of the PrintTask Class.
                 _PrintTask = new ESRI.ArcGIS.Client.Printing.PrintTask();

                 // Prevent the internet browser from using a cache for the PrintTask operations.
                 _PrintTask.DisableClientCaching = true;

                 // Set the PrintTask.Url from what is entered in the TextBox.
                 _PrintTask.Url = TextBox_Url.Text;

                 // Wire up an Event Handler for the PrintTask.StatusUpdated Event.
                 _PrintTask.StatusUpdated += printTask_StatusUpdated;

                 // Wire up an Event Handler for the PrintTask.SubmitJobCompleted Event.
                 _PrintTask.JobCompleted += printTask_JobCompleted;
                }

                private void Button1_Click(object sender, System.Windows.RoutedEventArgs e)
                {
                 // The user clicked the button to generate an output map image.

                 // Define the PrintParameters.
                 ESRI.ArcGIS.Client.Printing.PrintParameters myPrintParameters = new ESRI.ArcGIS.Client.Printing.PrintParameters(MyMap);

                 // Set the PrintParameters.LayoutTemplate to a valid Layout_Template in the Export Web Map Task service.
                 myPrintParameters.LayoutTemplate = TextBlock_LayoutTemplate.Text;

                 // Set the PrintParameters.Format to a valid image Format in the Export Web Map Task service.
                 myPrintParameters.Format = TextBlock_Format.Text;

                 // Define the MapOptions.
                 ESRI.ArcGIS.Client.Printing.MapOptions myMapOptions = new ESRI.ArcGIS.Client.Printing.MapOptions(MyMap.Extent);
                 myPrintParameters.MapOptions = myMapOptions;

                 // Specify the LayoutOptions to provide marginalia in the output map.
                 ESRI.ArcGIS.Client.Printing.LayoutOptions myLayoutOptions = new ESRI.ArcGIS.Client.Printing.LayoutOptions();

                 // Create a Dictionary to hold strings to override the displayof custom Text Elements in the Layout Template .mxd.
                 Dictionary<string, string> myCustomElements = new Dictionary<string, string>();

                 // The "MyCustomTextElement" name matches the Text Element 'Element Name' in the sample Layout Template.
                 // Set the text to be what the user entered in the TextBlock of the application.
                 myCustomElements.Add("MyCustomTextElement", TextBlock_CustomTextElement.Text);
                 myLayoutOptions.CustomTextElements = myCustomElements;

                 // Add everything to the PrintParameters.LayoutOptions.
                 myPrintParameters.LayoutOptions = myLayoutOptions;

                 // Submit the asynchronous geoprocessing task to ArcGIS Server.
                 _PrintTask.SubmitJobAsync(myPrintParameters);
                }

                private void printTask_JobCompleted(object sender, ESRI.ArcGIS.Client.Printing.PrintJobEventArgs e)
                {
                 // Use only for SubmitJobAsync operations (i.e. asynchronous geoprocessing tasks).

                 // Test if we have valid results coming back from ArcGIS Server.
                 if (e.PrintResult != null)
                 {
                  if (e.PrintResult.Url != null)
                  {
                   // Open a new internet browser window with the generated image from the PrintTask.
                   System.Windows.Browser.HtmlPage.Window.Navigate(e.PrintResult.Url, "_blank");

                   // Clear out the JobInfo messages since we have completed the asynchronous geoprocessing task.
                   TextBlock_JobId.Text = "";
                   TextBlock_JobStatus.Text = "";
                   ListBox_Messages.Items.Clear();
                  }
                 }
                }

                private void printTask_StatusUpdated(object sender, ESRI.ArcGIS.Client.Tasks.JobInfoEventArgs e)
                {
                 // Use only for SubmitJobAsync operations (i.e. asynchronous geoprocessing tasks).

                 // This Event fires as a result of the PrintTask.SumbitJobAsync Method being used previously. It
                 // can fire multiple times depending on the state of the geoprocessing task executing.

                 // Clear out any existing JobInfo messages.
                 TextBlock_JobId.Text = "";
                 TextBlock_JobStatus.Text = "";
                 ListBox_Messages.Items.Clear();

                 // Get the JobInfo information messages.
                 ESRI.ArcGIS.Client.Tasks.JobInfo myJobInfo = e.JobInfo;
                 string myJobId = myJobInfo.JobId;
                 ESRI.ArcGIS.Client.Tasks.esriJobStatus myJobStatus = myJobInfo.JobStatus;
                 List<ESRI.ArcGIS.Client.Tasks.GPMessage> myMessages = myJobInfo.Messages;

                 // Display the JobInfo messages to the user.
                 TextBlock_JobId.Text = myJobId;
                 TextBlock_JobStatus.Text = myJobStatus.ToString();
                 foreach (ESRI.ArcGIS.Client.Tasks.GPMessage myMessage in myMessages)
                 {
                  ListBox_Messages.Items.Add(myMessage.Description);
                 }
                }
               }
VB.NET:
Partial Public Class MainPage Inherits UserControl ' Create Global (aka. Member) variable for the PrintTask object that will be ' used in other parts of the application. Public _PrintTask As ESRI.ArcGIS.Client.Printing.PrintTask Public Sub New() InitializeComponent() ' Provide a valid PrintTask.Url for a "asynchronous geoprocessing task" TextBox_Url.Text = "http://dk-red2a:6080/arcgis/rest/services/MyCustomPrintTask/GPServer/Export20Web20Map" ' Set the _PrintTask variable to a new instance of the PrintTask Class. _PrintTask = New ESRI.ArcGIS.Client.Printing.PrintTask() ' Prevent the internet browser from using a cache for the PrintTask operations. _PrintTask.DisableClientCaching = True ' Set the PrintTask.Url from what is entered in the TextBox. _PrintTask.Url = TextBox_Url.Text ' Wire up an Event Handler for the PrintTask.StatusUpdated Event. AddHandler _PrintTask.StatusUpdated, AddressOf printTask_StatusUpdated ' Wire up an Event Handler for the PrintTask.SubmitJobCompleted Event. AddHandler _PrintTask.JobCompleted, AddressOf printTask_JobCompleted End Sub Private Sub Button1_Click(sender As System.Object, e As System.Windows.RoutedEventArgs) ' The user clicked the button to generate an output map image. ' Define the PrintParameters. Dim myPrintParameters As New ESRI.ArcGIS.Client.Printing.PrintParameters(MyMap) ' Set the PrintParameters.LayoutTemplate to a valid Layout_Template in the Export Web Map Task service. myPrintParameters.LayoutTemplate = TextBlock_LayoutTemplate.Text ' Set the PrintParameters.Format to a valid image Format in the Export Web Map Task service. myPrintParameters.Format = TextBlock_Format.Text ' Define the MapOptions. Dim myMapOptions As New ESRI.ArcGIS.Client.Printing.MapOptions(MyMap.Extent) myPrintParameters.MapOptions = myMapOptions ' Specify the LayoutOptions to provide marginalia in the output map. Dim myLayoutOptions As New ESRI.ArcGIS.Client.Printing.LayoutOptions ' Create a Dictionary to hold strings to override the displayof custom Text Elements in the Layout Template .mxd. Dim myCustomElements As New Dictionary(Of String, String) ' The "MyCustomTextElement" name matches the Text Element 'Element Name' in the sample Layout Template. ' Set the text to be what the user entered in the TextBlock of the application. myCustomElements.Add("MyCustomTextElement", TextBlock_CustomTextElement.Text) myLayoutOptions.CustomTextElements = myCustomElements ' Add everything to the PrintParameters.LayoutOptions. myPrintParameters.LayoutOptions = myLayoutOptions ' Submit the asynchronous geoprocessing task to ArcGIS Server. _PrintTask.SubmitJobAsync(myPrintParameters) End Sub Private Sub printTask_JobCompleted(sender As Object, e As ESRI.ArcGIS.Client.Printing.PrintJobEventArgs) ' Use only for SubmitJobAsync operations (i.e. asynchronous geoprocessing tasks). ' Test if we have valid results coming back from ArcGIS Server. If e.PrintResult IsNot Nothing Then If e.PrintResult.Url IsNot Nothing Then ' Open a new internet browser window with the generated image from the PrintTask. System.Windows.Browser.HtmlPage.Window.Navigate(e.PrintResult.Url, "_blank") ' Clear out the JobInfo messages since we have completed the asynchronous geoprocessing task. TextBlock_JobId.Text = "" TextBlock_JobStatus.Text = "" ListBox_Messages.Items.Clear() End If End If End Sub Private Sub printTask_StatusUpdated(sender As Object, e As ESRI.ArcGIS.Client.Tasks.JobInfoEventArgs) ' Use only for SubmitJobAsync operations (i.e. asynchronous geoprocessing tasks). ' This Event fires as a result of the PrintTask.SumbitJobAsync Method being used previously. It ' can fire multiple times depending on the state of the geoprocessing task executing. ' Clear out any existing JobInfo messages. TextBlock_JobId.Text = "" TextBlock_JobStatus.Text = "" ListBox_Messages.Items.Clear() ' Get the JobInfo information messages. Dim myJobInfo As ESRI.ArcGIS.Client.Tasks.JobInfo = e.JobInfo Dim myJobId As String = myJobInfo.JobId Dim myJobStatus As ESRI.ArcGIS.Client.Tasks.esriJobStatus = myJobInfo.JobStatus Dim myMessages As List(Of ESRI.ArcGIS.Client.Tasks.GPMessage) = myJobInfo.Messages ' Display the JobInfo messages to the user. TextBlock_JobId.Text = myJobId TextBlock_JobStatus.Text = myJobStatus.ToString For Each myMessage As ESRI.ArcGIS.Client.Tasks.GPMessage In myMessages ListBox_Messages.Items.Add(myMessage.Description) Next End Sub End Class -
Choose Build | Build Solution from the Visual Studio menus (you should not have any compiler Errors/Warnings.
-
Hit the F5 key (or click the Start Debugging button) in Visual Studio to launch the Silverlight application in Internet Explorer. Then click the 'Make a map using my custom Layout Template' button to launch the PrintTask operation:

-
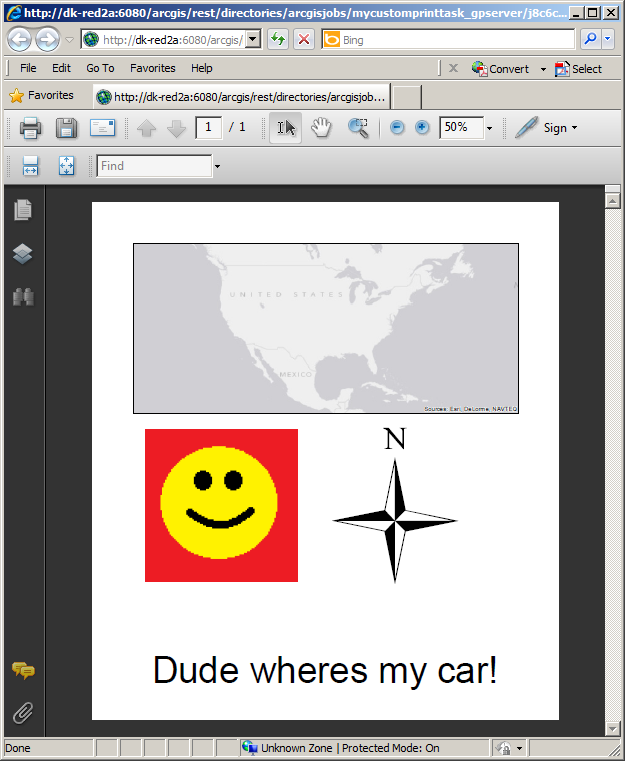
The final output should appear something similar to the following screen shot:
Requirements
Target Platforms: Windows XP Professional, Windows Server 2003 family, Windows Vista, Windows Server 2008 family, Windows 7