


 Syntax
| Visual Basic (Declaration) | |
|---|---|
Public Property Geometry As Geometry | |
| C# | |
|---|---|
public Geometry Geometry {get; set;} | |
Remarks
In order to display a Graphic on the Map, a Symbol must be associated with each Graphic. A Graphic’s Geometry Property must match the Symbol type. This means a MarkerSymbol for a MapPoint or MultiPoint, FillSymbol for a Polygon, and LineSymbol for a Polyline.
It is a good practice to provide a SpatialReference for the Geometry that is applied to the Graphic. Some operations like the various Geometry service functions must have a valid SpatialReference in order to work.
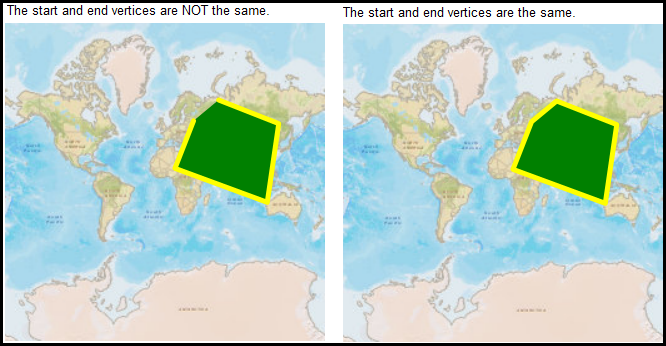
Special consideration for Graphics based upon Polygon geometries: In order to have the correct exterior FillSymbol.BorderBrush Symbology associated with a Polygon Graphic, it is important that the PointCollection of MapPoints that are used to define the Rings for a Polygon close back on itself. This means that the first and last MapPoint vertices must have the same coordinate values. If the first and last MapPoint vertices are not the same the Polygon graphic will close back on itself automatically but the ending segment will not have any symbology for the exterior BorderBrush displayed. See the following screen shot for a visual example:
Example
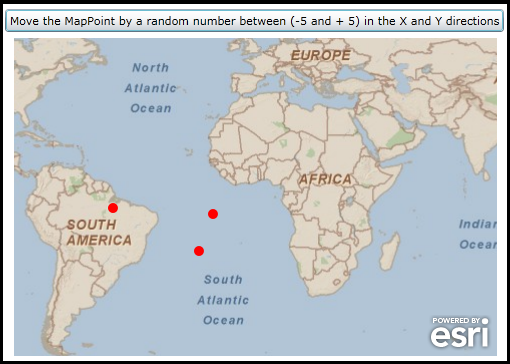
How to use:
Click the button several times to move the MapPoint Graphics randomly around on the screen. The Graphics were originally defined in XAML and the movement occurs from changing the Graphics Geometry in the code-behind file.
The XAML code in this example is used in conjunction with the code-behind (C# or VB.NET) to demonstrate the functionality.
The following screen shot corresponds to the code example in this page.
| XAML |  Copy Code Copy Code |
|---|---|
<Grid x:Name="LayoutRoot"> <!-- Define a SimpleMarkerSymbol and a SpatialReference in the Resources section of the XAML file. --> <Grid.Resources> <!-- Tip: Use x:Key Attribute and not x:Name Attribute for defining the name of the Resources so that you can access the Resource in the code-behind file. --> <!-- The 'RedMarkerSymbol' will be used as the default symbol for the Graphics. --> <esri:SimpleMarkerSymbol x:Key="RedMarkerSymbol" Color="Red"/> <!-- Define a SpatialReference object that has the same WKID as the ArcGISTiledMapServiceLayer in the Map. This will allow for the Graphics in the GraphicsLayer to line up properly. --> <esri:SpatialReference x:Key="theSpatialReference" WKID="4326"/> </Grid.Resources> <!-- Add a Map control with an ArcGISTiledMapServiceLayer and a GraphicsLayer. The GraphicsLayer will contain several Graphics based upon MapPoint geometries (which use the defined SpatialReference) and using the RedMarkerSymbol as the default symbolization. --> <esri:Map Background="White" HorizontalAlignment="Left" Margin="14,94,0,0" Name="Map1" VerticalAlignment="Top" Height="318" Width="483" > <esri:ArcGISTiledMapServiceLayer ID="PhysicalTiledLayer" Url="http://services.arcgisonline.com/ArcGIS/rest/services/ESRI_StreetMap_World_2D/MapServer"/> <!-- It is important to provide the GraphicsLayer with an 'ID' Attribute so to be able to access it in the code-behind file. --> <esri:GraphicsLayer ID="MyGraphicsLayer" > <esri:GraphicsLayer.Graphics> <!-- Each Graphic added to the GraphicsLayer will have it's symbology and geometry defined. --> <esri:Graphic Symbol="{StaticResource RedMarkerSymbol}"> <esri:MapPoint X="-10" Y="-20" SpatialReference="{StaticResource theSpatialReference}"/> </esri:Graphic> <esri:Graphic Symbol="{StaticResource RedMarkerSymbol}"> <esri:MapPoint X="-5" Y="0" SpatialReference="{StaticResource theSpatialReference}"/> </esri:Graphic> <esri:Graphic Symbol="{StaticResource RedMarkerSymbol}"> <esri:MapPoint X="-25" Y="10" SpatialReference="{StaticResource theSpatialReference}"/> </esri:Graphic> </esri:GraphicsLayer.Graphics> </esri:GraphicsLayer> </esri:Map> <!-- Add a Button to perform the work. Note the Click Event handler is wired-up to use code-behind. --> <Button Content="Move the MapPoint by a random number between (-5 and + 5) in the X and Y directions" Height="23" HorizontalAlignment="Left" Margin="5,65,0,0" Name="Button1" VerticalAlignment="Top" Width="499" Click="Button1_Click"/> <!-- Provide the instructions on how to use the sample code. --> <TextBlock Height="47" HorizontalAlignment="Left" Name="TextBlock1" VerticalAlignment="Top" Width="616" TextWrapping="Wrap" Margin="12,12,0,0" Text="Click the button several times to move the MapPoint Graphics randomly around on the screen. The Graphics were originally defined in XAML and the movement occurs from changing the Graphics Geometry in the code-behind file." /> </Grid> | |
| C# | Copy Code |
|---|---|
private void Button1_Click(object sender, System.Windows.RoutedEventArgs e) { // Move the MapPoint Graphic by a random number between (-5 and + 5) in the X and Y directions // Obtain the GraphicsLayer that was defined in XAML. ESRI.ArcGIS.Client.GraphicsLayer theGraphicsLayer = null; theGraphicsLayer = (ESRI.ArcGIS.Client.GraphicsLayer)(Map1.Layers["MyGraphicsLayer"]); // Get the GraphicCollection from the GraphicsLayer ESRI.ArcGIS.Client.GraphicCollection theGraphicsCollection = theGraphicsLayer.Graphics; // Loop through all of the individual Graphic objects in the GraphicsCollection. foreach (ESRI.ArcGIS.Client.Graphic aGraphic in theGraphicsCollection) { // Get the Geometry from the Graphic and cast it to a MapPoint. ESRI.ArcGIS.Client.Geometry.MapPoint oldMapPoint = null; oldMapPoint = (ESRI.ArcGIS.Client.Geometry.MapPoint)aGraphic.Geometry; // Generate a random number for the X and Y coordinates (bounded between 0 and 5). System.Random aRandom = new System.Random(); int aRandomNumberX = aRandom.Next(0, 5); int aRandomNumberY = aRandom.Next(0, 5); // Generate a random number for positive and negative values (i.e either -1 or +1) float makePositiveorNegative = (float)(Microsoft.VisualBasic.VBMath.Rnd(3)); int theNegator = 0; if (makePositiveorNegative > 0.5) { theNegator = 1; } else { theNegator = -1; } // Create a new MapPoint using the cooordinates from the original Graphics MapPoint that // is offset by a random number between (-5 and +5) ESRI.ArcGIS.Client.Geometry.MapPoint newMapPoint = new ESRI.ArcGIS.Client.Geometry.MapPoint(); newMapPoint.X = oldMapPoint.X + (theNegator * aRandomNumberX); newMapPoint.Y = oldMapPoint.Y + (theNegator * aRandomNumberY); // Set the Geometry of the Graphic to the new coordinates. By changing the Graphic's Geometry // it automatically moves on the Map Control (no Map refresh is required). aGraphic.Geometry = newMapPoint; } } | |
| VB.NET | Copy Code |
|---|---|
Private Sub Button1_Click(ByVal sender As System.Object, ByVal e As System.Windows.RoutedEventArgs) ' Move the MapPoint Graphic by a random number between (-5 and + 5) in the X and Y directions ' Obtain the GraphicsLayer that was defined in XAML. Dim theGraphicsLayer As ESRI.ArcGIS.Client.GraphicsLayer theGraphicsLayer = CType(Map1.Layers("MyGraphicsLayer"), ESRI.ArcGIS.Client.GraphicsLayer) ' Get the GraphicCollection from the GraphicsLayer Dim theGraphicsCollection As ESRI.ArcGIS.Client.GraphicCollection = theGraphicsLayer.Graphics ' Loop through all of the individual Graphic objects in the GraphicsCollection. Dim aGraphic As ESRI.ArcGIS.Client.Graphic For Each aGraphic In theGraphicsCollection ' Get the Geometry from the Graphic and cast it to a MapPoint. Dim oldMapPoint As ESRI.ArcGIS.Client.Geometry.MapPoint oldMapPoint = CType(aGraphic.Geometry, ESRI.ArcGIS.Client.Geometry.MapPoint) ' Generate a random number for the X and Y coordinates (bounded between 0 and 5). Dim aRandom As New System.Random Dim aRandomNumberX As Integer = aRandom.Next(0, 5) Dim aRandomNumberY As Integer = aRandom.Next(0, 5) ' Generate a random number for positive and negative values (i.e either -1 or +1) Dim makePositiveorNegative As Single = Rnd(3) Dim theNegator As Integer If makePositiveorNegative > 0.5 Then theNegator = 1 Else theNegator = -1 End If ' Create a new MapPoint using the coordinates from the original Graphics MapPoint that ' is offset by a random number between (-5 and +5) Dim newMapPoint As New ESRI.ArcGIS.Client.Geometry.MapPoint newMapPoint.X = oldMapPoint.X + (theNegator * aRandomNumberX) newMapPoint.Y = oldMapPoint.Y + (theNegator * aRandomNumberY) ' Set the Geometry of the Graphic to the new coordinates. By changing the Graphic's Geometry ' it automatically moves on the Map Control (no Map refresh is required). aGraphic.Geometry = newMapPoint Next End Sub | |
Requirements
Target Platforms: Windows XP Professional, Windows Server 2003 family, Windows Vista, Windows Server 2008 family, Windows 7, Windows 8