


 Syntax
| Visual Basic (Declaration) | |
|---|---|
Public Property YFieldName As String | |
| C# | |
|---|---|
public string YFieldName {get; set;} | |
Remarks
In order to make use of CSV files in the ArcGIS API for Silverlight there should be point based spatial locational coordinate information for each record. This spatial information defines the MapPoint that will be used to construct a custom GraphicsLayer. Other geography types like Polyline or Polygon are not supported for constructing a CsvLayer. Unless specified otherwise in the SourceSpatialReference Property, it is assumed that the SpatialReference of the CsvLayer has a WKID value of 4326. During the parsing process of reading the header record of the CSV file to construct the CsvLayer, any of the following names can be used to automatically detect the spatial location coordinate information:
| Coordinate Type | Automatically detected Field names |
|---|---|
| LATITUDE | "lat", "latitude", "y", "ycenter", "latitude83", "latdecdeg", "point-y" |
| LONGITUDE | "lon", "lng", "long", "longitude", "x", "xcenter", "longitude83", "longdecdeg", "point-x" |
NOTE: The CsvLayer parsing algorithm for the Field names listed in the table above is case insensitive.
If the above spatial location coordinate field names are not specified in the header record, then it will be required to specify them explicitly. Use the XFieldName Property to explicitly specify the Longitude coordinate and the YFieldName Property to explicitly specify the Latitude coordinate.
Example
How to use:
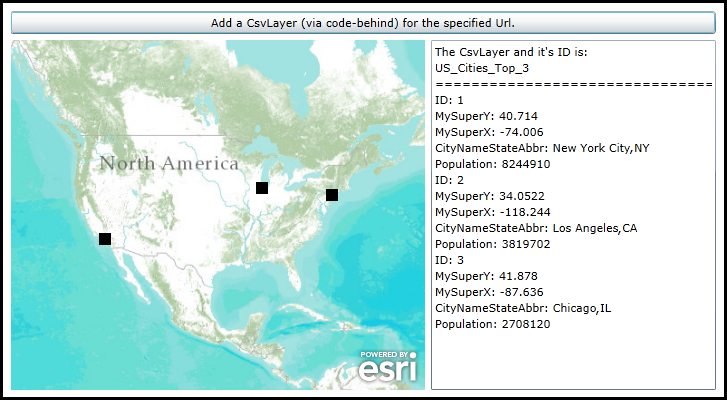
Click the Button to add a CsvLayer to the Map. The ID of the layer and its attribute information will displayed in the TextBox.
The XAML code in this example is used in conjunction with the code-behind (C# or VB.NET) to demonstrate the functionality.
The following is an example of the ASCII contents for the file named US_Cities_Top_3.csv:
ID,MySuperY,MySuperX,CityNameStateAbbr,Population
1,40.714,-74.006,"New York City, NY",8244910
2,34.0522,-118.244,"Los Angeles, CA",3819702
3,41.878,-87.636,"Chicago, IL",2708120
The following screen shot corresponds to the code example in this page.
| XAML |  Copy Code Copy Code |
|---|---|
<Grid x:Name="LayoutRoot" > <!-- Add a Map Control to the application. Set the Extent to North America. --> <esri:Map x:Name="Map1" HorizontalAlignment="Left" VerticalAlignment="Top" Margin="0,238,0,0" Height="350" Width="415" Extent="-15219969,2609636,-6232883,6485365"> <!-- Add a backdrop ArcGISTiledMapServiceLayer. --> <esri:ArcGISTiledMapServiceLayer ID="World_Topo_Map" Url="http://services.arcgisonline.com/arcgis/rest/services/world_topo_map/MapServer" /> </esri:Map> <!-- Add a Button that will allow the user to add a CsvLayer via code-behind. --> <Button Name="Button1" Height="23" HorizontalAlignment="Left" Margin="0,209,0,0" VerticalAlignment="Top" Width="706" Content="Add a CsvLayer (via code-behind) for the specified Url." Click="Button1_Click" /> <!-- TextBox to display attribute information about about the CsvLayer added to the Map. --> <TextBox Height="350" HorizontalAlignment="Left" Margin="421,238,0,0" Name="TextBox1" VerticalAlignment="Top" Width="285" /> <!-- Provide the instructions on how to use the sample code. --> <TextBlock Height="174" HorizontalAlignment="Left" Name="TextBlock1" VerticalAlignment="Top" Width="788" TextWrapping="Wrap" Text="Click the Button to add a CsvLayer to the Map. The ID of the layer and its attribute information will displayed in the TextBox." /> </Grid> | |
| C# | Copy Code |
|---|---|
private void Button1_Click(object sender, System.Windows.RoutedEventArgs e) { // This function executes as a result of the user clicking the Button. It adds a CsvLayer using code-behind. // Create a CsvLayer. ESRI.ArcGIS.Client.Toolkit.DataSources.CsvLayer myCsvLayer = new ESRI.ArcGIS.Client.Toolkit.DataSources.CsvLayer(); // Set the Url of the CsvLayer to a public service. // NOTE: you need to adjust the Url to a .csv file served up on you test web server. myCsvLayer.Url = "http://www.yourserver.com/CSV_Files/US_Cities_Top_3.csv"; // Set the ID of the CsvLayer. myCsvLayer.ID = "US_Cities_Top_3"; // Set the XFieldName and YFieldName Properties. This CSV file does not use standard X & Y field names. myCsvLayer.XFieldName = "MySuperX"; myCsvLayer.YFieldName = "MySuperY"; // Create a SimpleMarkerSymbol (a black square) for the CsvLayer that will be added. ESRI.ArcGIS.Client.Symbols.SimpleMarkerSymbol theSimpleMarkerSymbol = new ESRI.ArcGIS.Client.Symbols.SimpleMarkerSymbol(); theSimpleMarkerSymbol.Color = new System.Windows.Media.SolidColorBrush(System.Windows.Media.Colors.Black); theSimpleMarkerSymbol.Size = 12; theSimpleMarkerSymbol.Style = ESRI.ArcGIS.Client.Symbols.SimpleMarkerSymbol.SimpleMarkerStyle.Square; // Define a SimpleRenderer and set the Symbol to the SimpleMarkerSymbol. ESRI.ArcGIS.Client.SimpleRenderer theSimpleRenderer = new ESRI.ArcGIS.Client.SimpleRenderer(); theSimpleRenderer.Symbol = theSimpleMarkerSymbol; // Define the Renderer for the CsvLayer. myCsvLayer.Renderer = theSimpleRenderer; // Wire-up the Initialized Event of the CsvLayer. myCsvLayer.Initialized += CsvLayer_Initialized; // Add the CsvLayer to the Map. Map1.Layers.Add(myCsvLayer); } private void CsvLayer_Initialized(object sender, EventArgs e) { // This function will execute as a result of the CsvLayer that was defined in code-behind being Initialized. // Get the CsvLayer. ESRI.ArcGIS.Client.Toolkit.DataSources.CsvLayer myCsvLayer = (ESRI.ArcGIS.Client.Toolkit.DataSources.CsvLayer)sender; // Get the ID of the CsvLayer. string myID = myCsvLayer.ID; // Create a StringBuilder object to hold information about the CsvLayer and add some useful information to it. System.Text.StringBuilder myStringBuilder = new System.Text.StringBuilder(); myStringBuilder.Append("The CsvLayer and it's ID is: " + Environment.NewLine); myStringBuilder.Append(myID + Environment.NewLine); myStringBuilder.Append("====================================" + Environment.NewLine); // Get the GraphicCollection from the CsvLayer. ESRI.ArcGIS.Client.GraphicCollection theGraphicCollection = myCsvLayer.Graphics; if (theGraphicCollection != null) { // Loop through each Graphic. foreach (ESRI.ArcGIS.Client.Graphic oneGraphic in theGraphicCollection) { // Get the Attribute Keys. System.Collections.Generic.ICollection<string> theFieldNameKeys = oneGraphic.Attributes.Keys; // Loop through each Attribute. foreach (var oneKey in theFieldNameKeys) { // Get the value of the Attribute Field. string theValue = (string)oneGraphic.Attributes[oneKey]; // Add the Attribute Field name and Attribute value to the StringBuilder object. myStringBuilder.Append(oneKey.ToString() + ": " + theValue + Environment.NewLine); } } } // Display the results of the StringBuilder text to the user. TextBox1.Text = myStringBuilder.ToString(); } | |
| VB.NET | Copy Code |
|---|---|
Private Sub Button1_Click(sender As System.Object, e As System.Windows.RoutedEventArgs) ' This function executes as a result of the user clicking the Button. It adds a CsvLayer using code-behind. ' Create a CsvLayer. Dim myCsvLayer As ESRI.ArcGIS.Client.Toolkit.DataSources.CsvLayer = New ESRI.ArcGIS.Client.Toolkit.DataSources.CsvLayer ' Set the Url of the CsvLayer to a public service. ' NOTE: you need to adjust the Url to a .csv file served up on you test web server. myCsvLayer.Url = "http://www.yourserver.com/CSV_Files/US_Cities_Top_3.csv" ' Set the ID of the CsvLayer. myCsvLayer.ID = "US_Cities_Top_3" ' Set the XFieldName and YFieldName Properties. This CSV file does not use standard X & Y field names. myCsvLayer.XFieldName = "MySuperX" myCsvLayer.YFieldName = "MySuperY" ' Create a SimpleMarkerSymbol (a black square) for the CsvLayer that will be added. Dim theSimpleMarkerSymbol As ESRI.ArcGIS.Client.Symbols.SimpleMarkerSymbol = New ESRI.ArcGIS.Client.Symbols.SimpleMarkerSymbol theSimpleMarkerSymbol.Color = New System.Windows.Media.SolidColorBrush(System.Windows.Media.Colors.Black) theSimpleMarkerSymbol.Size = 12 theSimpleMarkerSymbol.Style = ESRI.ArcGIS.Client.Symbols.SimpleMarkerSymbol.SimpleMarkerStyle.Square ' Define a SimpleRenderer and set the Symbol to the SimpleMarkerSymbol. Dim theSimpleRenderer As ESRI.ArcGIS.Client.SimpleRenderer = New ESRI.ArcGIS.Client.SimpleRenderer theSimpleRenderer.Symbol = theSimpleMarkerSymbol ' Define the Renderer for the CsvLayer. myCsvLayer.Renderer = theSimpleRenderer ' Wire-up the Initialized Event of the CsvLayer. AddHandler myCsvLayer.Initialized, AddressOf CsvLayer_Initialized ' Add the CsvLayer to the Map. Map1.Layers.Add(myCsvLayer) End Sub Private Sub CsvLayer_Initialized(sender As Object, e As EventArgs) ' This function will execute as a result of the CsvLayer that was defined in code-behind being Initialized. ' Get the CsvLayer. Dim myCsvLayer As ESRI.ArcGIS.Client.Toolkit.DataSources.CsvLayer = CType(sender, ESRI.ArcGIS.Client.Toolkit.DataSources.CsvLayer) ' Get the ID of the CsvLayer. Dim myID As String = myCsvLayer.ID ' Create a StringBuilder object to hold information about the CsvLayer and add some useful information to it. Dim myStringBuilder As New Text.StringBuilder myStringBuilder.Append("The CsvLayer and it's ID is: " + vbCrLf) myStringBuilder.Append(myID + vbCrLf) myStringBuilder.Append("====================================" + vbCrLf) ' Get the GraphicCollection from the CsvLayer. Dim theGraphicCollection As ESRI.ArcGIS.Client.GraphicCollection = myCsvLayer.Graphics If theGraphicCollection IsNot Nothing Then ' Loop through each Graphic. For Each oneGraphic As ESRI.ArcGIS.Client.Graphic In theGraphicCollection ' Get the Attribute Keys. Dim theFieldNameKeys As System.Collections.Generic.ICollection(Of String) = oneGraphic.Attributes.Keys ' Loop through each Attribute. For Each oneKey In theFieldNameKeys ' Get the value of the Attribute Field. Dim theValue As String = oneGraphic.Attributes(oneKey) ' Add the Attribute Field name and Attribute value to the StringBuilder object. myStringBuilder.Append(oneKey.ToString + ": " + theValue + vbCrLf) Next Next End If ' Display the results of the StringBuilder text to the user. TextBox1.Text = myStringBuilder.ToString End Sub | |
Requirements
Target Platforms: Windows XP Professional, Windows Server 2003 family, Windows Vista, Windows Server 2008 family, Windows 7