One you've joined the Analysis and Geoprocessing Tool Gallery group, you can share your content to the group. The basic workflow is:
- Add your geoprocessing package, sample, or service item to MY CONTENT.
- Update the item details to include a good title, summary, description, access constraints, and tags. In the description, be sure to note software requirements.
- Share your item with everyone (public) and the tool gallery.
The Analysis and Geoprocessing Tool Gallery is meant for high-quality items that will serve the geoprocessing community well. Items you submit should meet this goal. They should have great descriptions, good tagging, and, of course, be robust and work as advertised. The tools themselves should be well documented.
Learn more about documenting tools
The group owner (ArcGISTeamAnalysis) reserves the right to remove items from the gallery we think are inappropriate or incomplete. We never delete items (we don't have permission to do so); we can only remove the share to the gallery.
Add your geoprocessing item to MY CONTENT
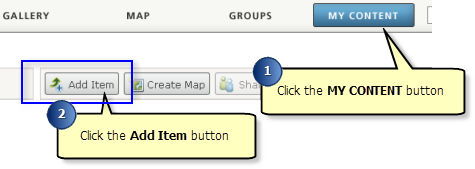
After signing in, you should be taken to the MY CONTENT page of your account. If not, click the MY CONTENT button found at the top of every ArcGIS Online page. Click the Add Item button to add content.

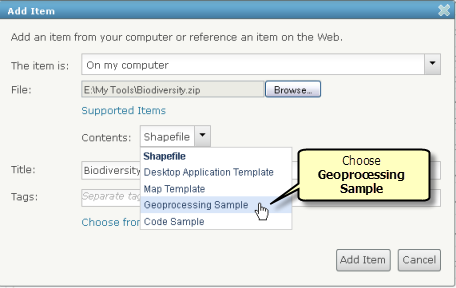
If you are adding a .zip file, be sure to choose Geoprocessing Sample in the Contents drop-down list, as illustrated below. This drop-down list will be enabled after you've specified a file to upload. You cannot change the content type after the item is uploaded, so if you make a mistake here, you'll have to delete your item and add it again.

Update the item details
After you've added your item, the item details page opens. Click the Edit button to add or update the thumbnail illustration, Summary, Description, Access and Use Constraints, and Tags. You can edit and update your item details at any time—even after you've shared your item.
Documenting software requirements
By following the guidelines below, everyone can quickly determine the software requirements of your tool and decide if they can use the item with their current software version.
At the bottom of your Description, insert a new sentence like this:
Software requirements: |
"Software requirements:" should be underlined as shown above—it makes it easier to locate by the reader. After this, you'll add a sentence for each of the following:
 software release—followed  by 'or later', if applicable
 license level—followed by 'or higher', if applicable
 required extensions
 required third-party libraries
Example: a tool that works in 10.0 and 10.1 (but not 9.3), with an ArcInfo/Advanced license:
 Software requirements:
 ArcGIS 10.0 or later
 ArcInfo (Advanced) license
Example: a tool that works in only 10.1, with a Standard or Advanced license, using the 3D Analyst extension:
 Software requirements:
 ArcGIS 10.1
 Standard license or higher
 3D Analyst extension
Example: a tool that works in 9.3.1, 10.0, and 10.1, with an ArcView license, requiring the matplotlib Python package (note the link to the matplotlib website—providing the link really helps):
 Software requirements:
 ArcGIS 9.3.1 or later
 ArcView (Basic) license or higher
  matplotlib 1.1.0
Share your item to the group
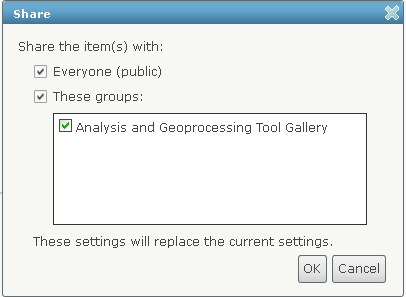
Once you're satisfied with your item details, you're ready to share to the gallery. On the item details page, click the Share button, and check Everyone (public) and Analysis and Geoprocessing Tool Gallery, as illustrated below.

Be sure to share with Everyone (public). If you don't share with everyone, then only members of the group can find and download your item.

